> ## Documentation Index
> Fetch the complete documentation index at: https://docs.zoice.com/llms.txt
> Use this file to discover all available pages before exploring further.
# How to Add Products to Your AI Avatar Video
> Learn how to make a product marketing video using AI with Zoice. Upload your presenter avatar, write a promotional script for your product, and generate a professional product showcase video in minutes.
 Promoting products and creating engaging marketing content is simple and cost-effective with artificial intelligence. You no longer need an expensive camera crew, studio rentals, or professional actors to showcase your products to customers.
With Zoice, you can upload your custom presenter avatar, write a script featuring your product details, select a voice, and generate a realistic AI product explainer video with natural expressions and lip-syncing.
Whether you are an e-commerce store owner, a digital marketer, or a content creator promoting affiliate products, adding products to your AI avatar video is the perfect way to boost sales and engagement.
In this article, you will learn how to add products to your AI avatar video using Zoice by following a complete step-by-step process.
## What is a Product Showcase AI Avatar Video?
A product showcase AI avatar video is an AI-generated promotional video where a digital presenter explains a product's features, benefits, or pricing.
The AI automatically analyzes your product copy or script, matches the timing, and animates the presenter's lip movements, head tilts, and facial expressions to deliver a natural, persuasive pitch.
Using an AI avatar for products is highly effective for:
* E-commerce product description pages (PDPs)
* Social media ads (TikTok, Instagram, Facebook)
* Email marketing campaigns
* Product launch updates and demo videos
## How to Add Products to Your AI Avatar Video Using Zoice
Adding products to your AI avatar video with Zoice takes only a few minutes. Follow the detailed steps below to generate your product marketing video.
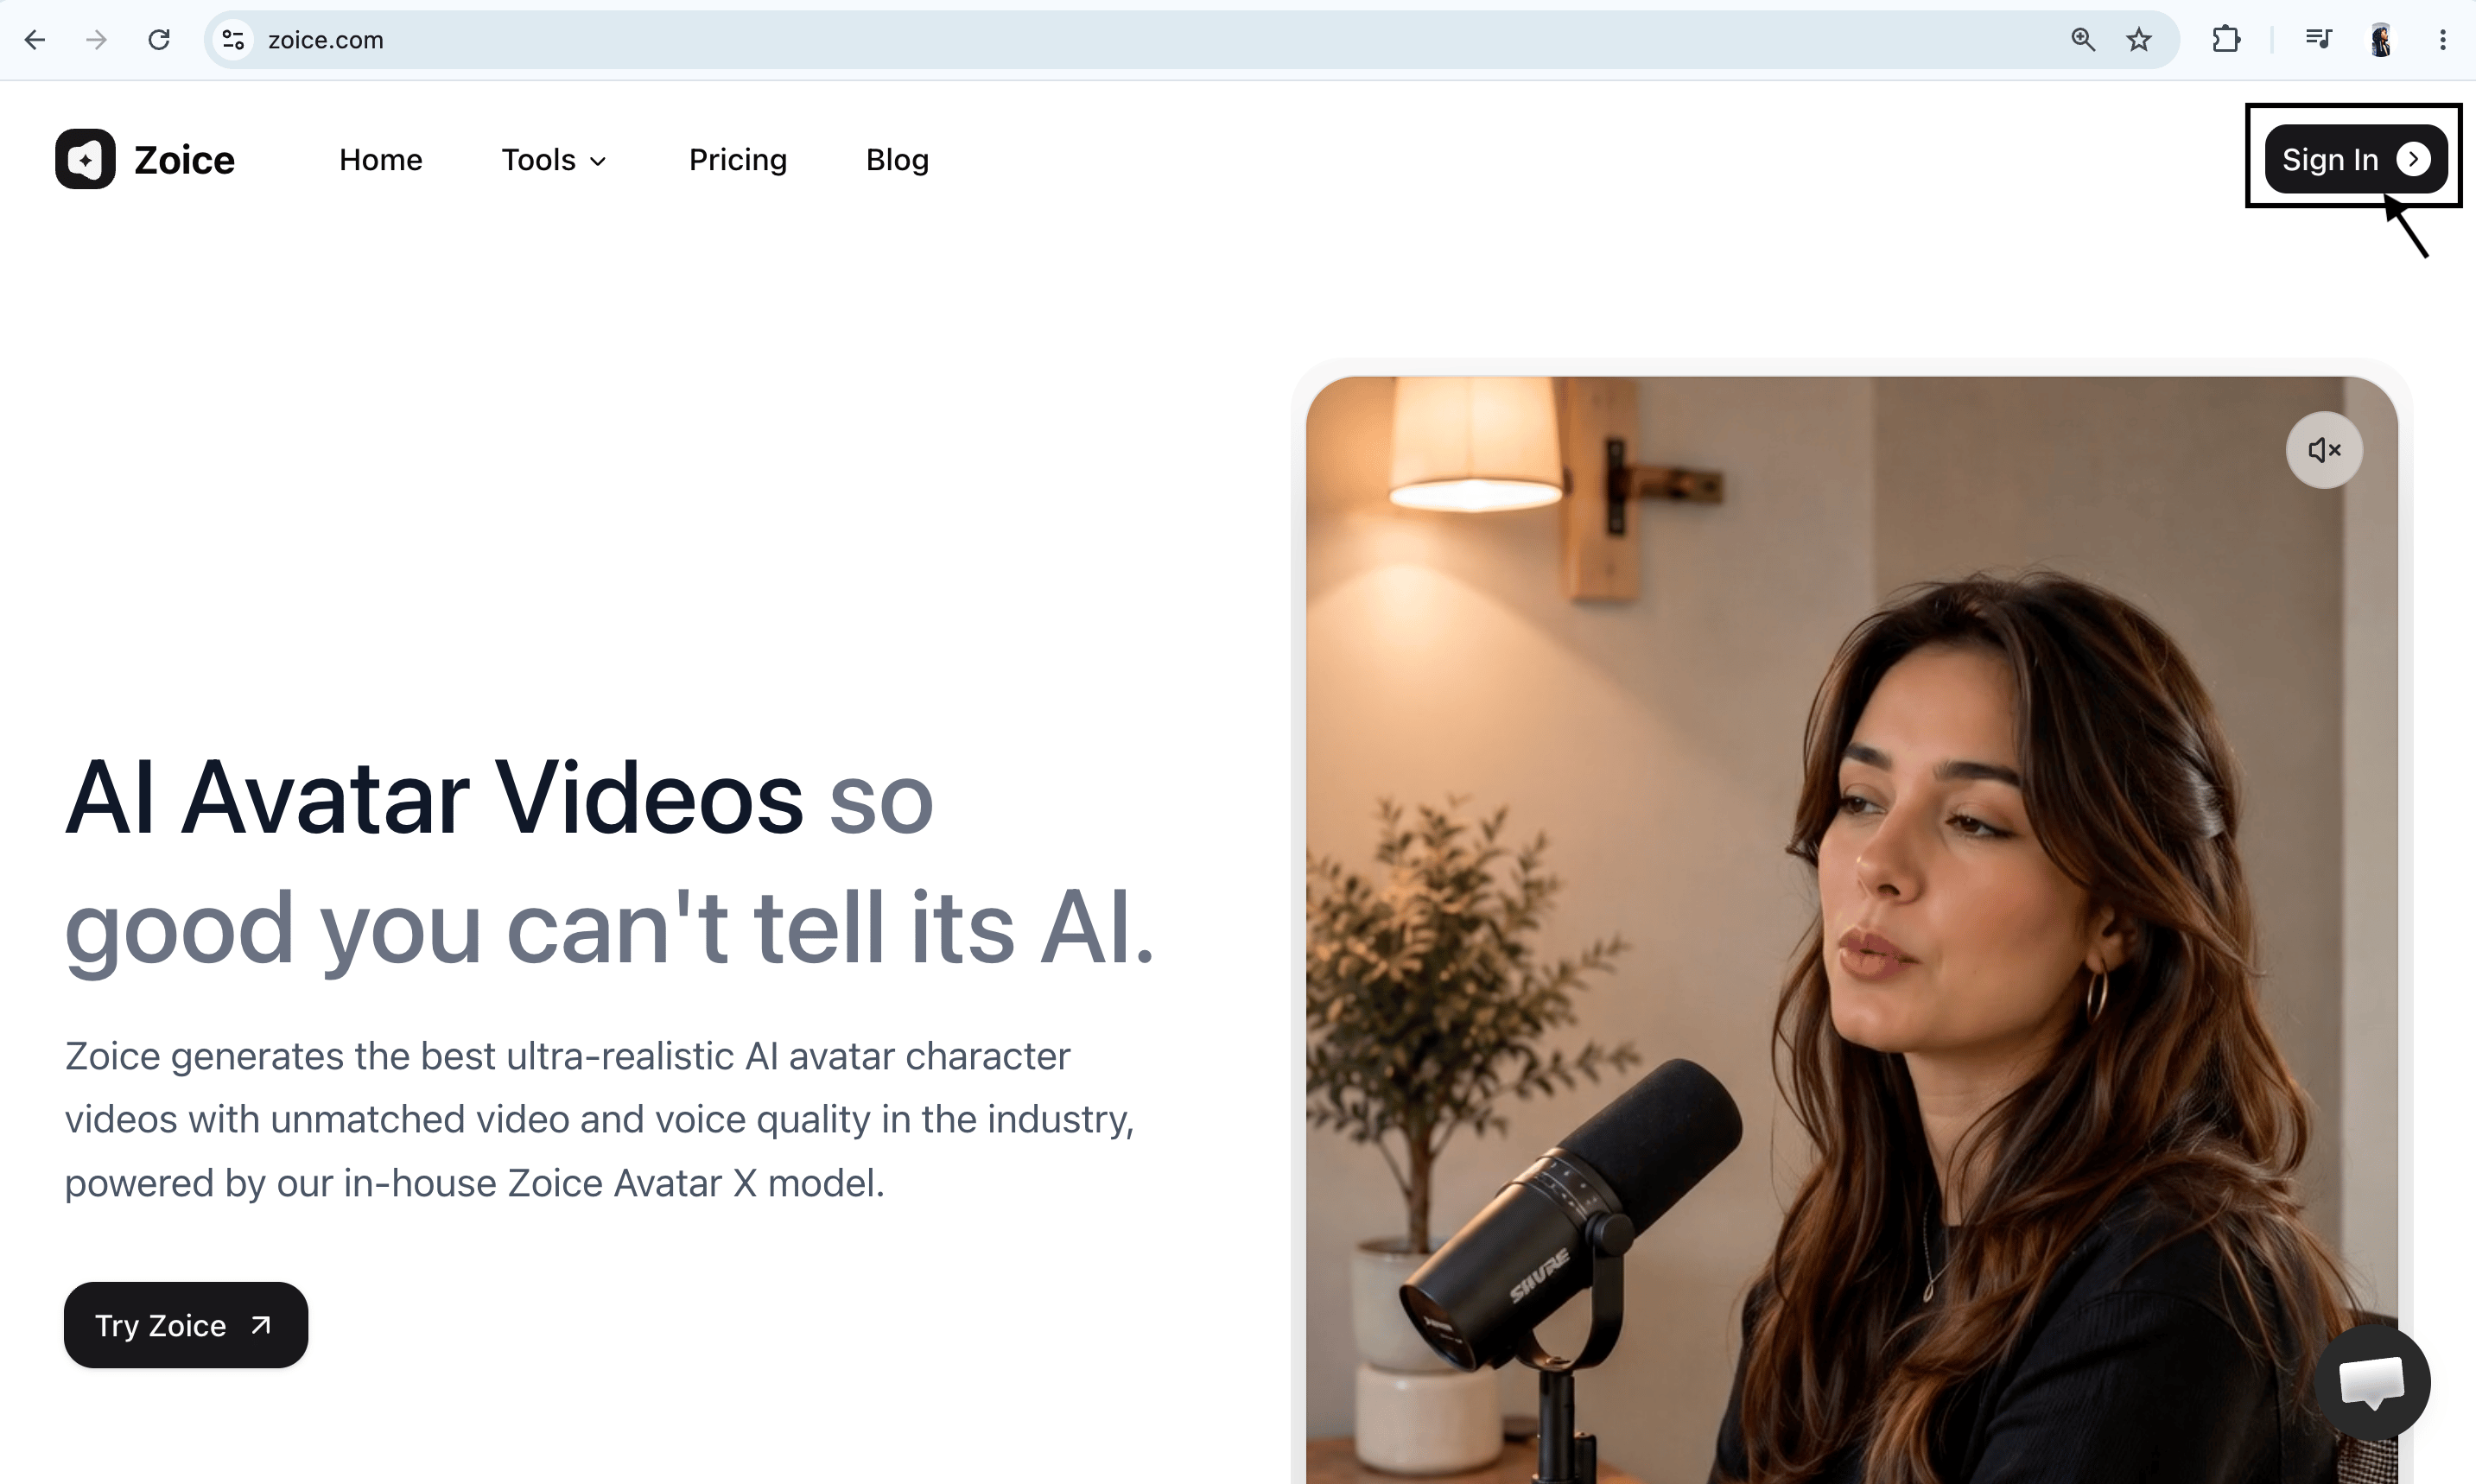
### Step 1: Visit Zoice and Click Sign In
Go to the [Zoice website](https://zoice.com) and click the **Sign In** button at the top-right corner of the homepage.
Promoting products and creating engaging marketing content is simple and cost-effective with artificial intelligence. You no longer need an expensive camera crew, studio rentals, or professional actors to showcase your products to customers.
With Zoice, you can upload your custom presenter avatar, write a script featuring your product details, select a voice, and generate a realistic AI product explainer video with natural expressions and lip-syncing.
Whether you are an e-commerce store owner, a digital marketer, or a content creator promoting affiliate products, adding products to your AI avatar video is the perfect way to boost sales and engagement.
In this article, you will learn how to add products to your AI avatar video using Zoice by following a complete step-by-step process.
## What is a Product Showcase AI Avatar Video?
A product showcase AI avatar video is an AI-generated promotional video where a digital presenter explains a product's features, benefits, or pricing.
The AI automatically analyzes your product copy or script, matches the timing, and animates the presenter's lip movements, head tilts, and facial expressions to deliver a natural, persuasive pitch.
Using an AI avatar for products is highly effective for:
* E-commerce product description pages (PDPs)
* Social media ads (TikTok, Instagram, Facebook)
* Email marketing campaigns
* Product launch updates and demo videos
## How to Add Products to Your AI Avatar Video Using Zoice
Adding products to your AI avatar video with Zoice takes only a few minutes. Follow the detailed steps below to generate your product marketing video.
### Step 1: Visit Zoice and Click Sign In
Go to the [Zoice website](https://zoice.com) and click the **Sign In** button at the top-right corner of the homepage.
 ### Step 2: Create a New Zoice Account (For New Users)
If you are using Zoice for the first time, click **Sign Up** to create a new account.
### Step 2: Create a New Zoice Account (For New Users)
If you are using Zoice for the first time, click **Sign Up** to create a new account.
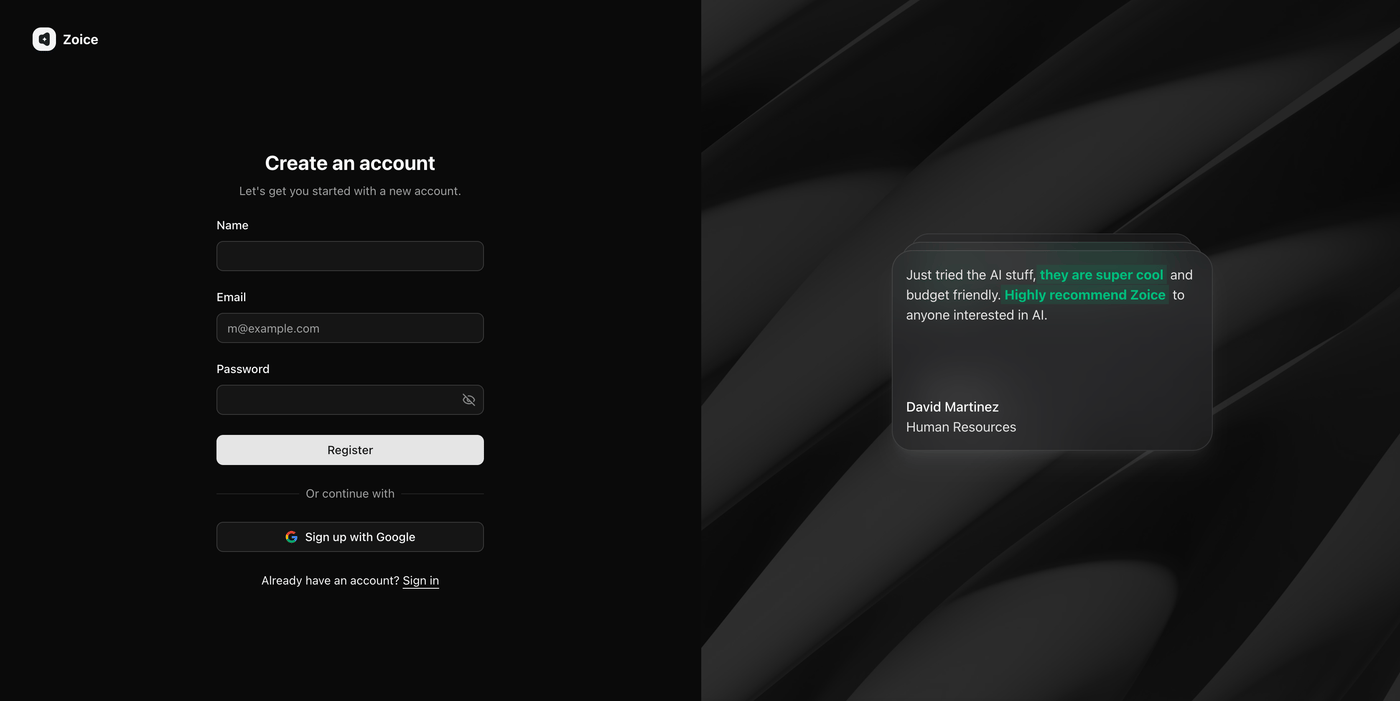 Enter your name, email, and password, or choose **Sign up with Google** to register instantly.
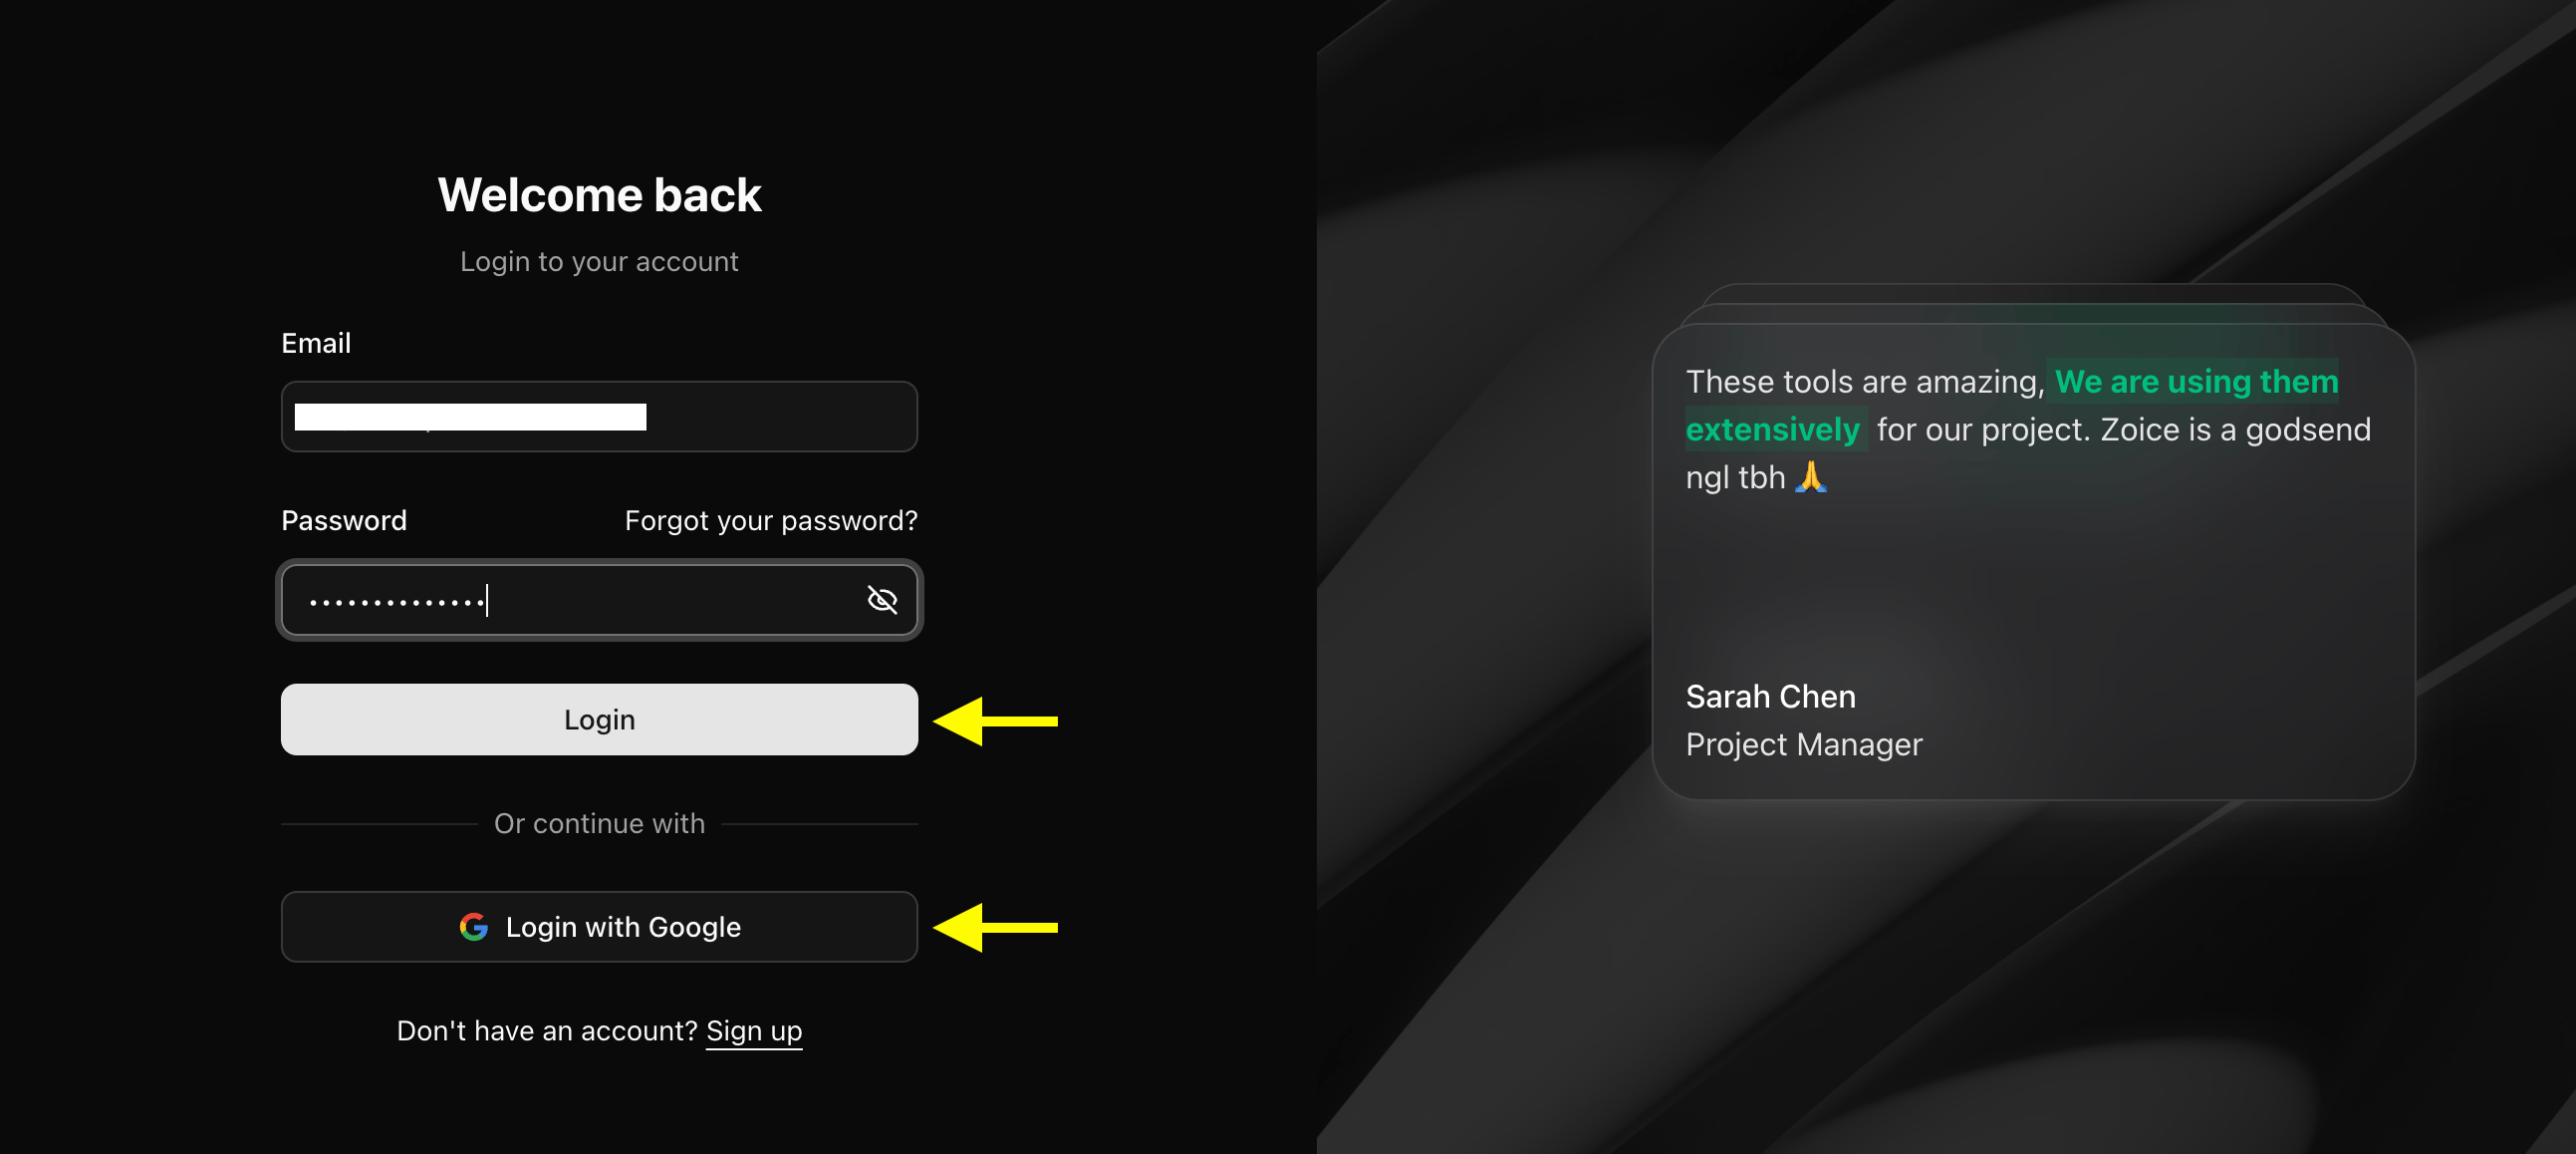
### Step 3: Sign In to Your Zoice Account
Once registered, sign in with your email and password or use the Google sign-in option to access the dashboard.
Enter your name, email, and password, or choose **Sign up with Google** to register instantly.
### Step 3: Sign In to Your Zoice Account
Once registered, sign in with your email and password or use the Google sign-in option to access the dashboard.
 ### Step 4: Navigate to Avatar Characters
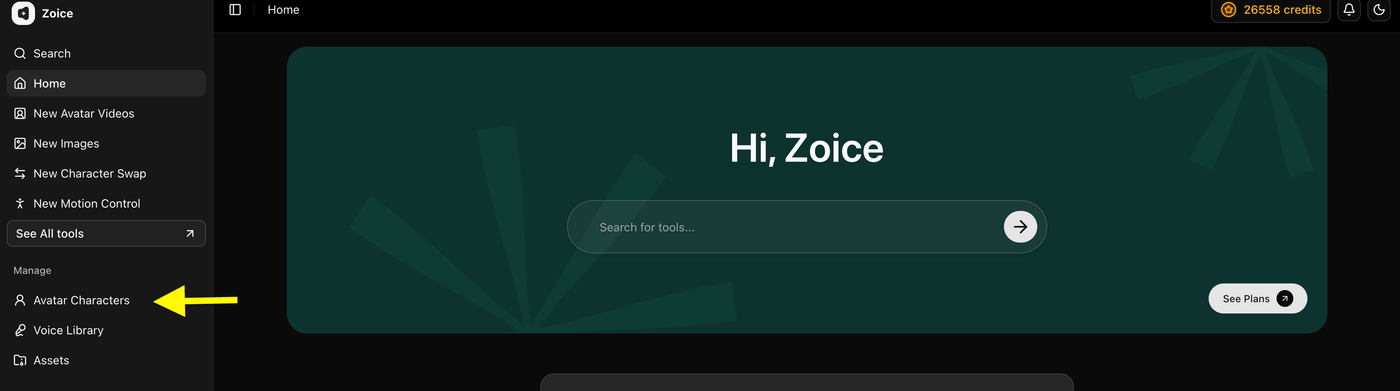
From the left sidebar of the Zoice dashboard, click **Avatar Characters** under the Manage section.
### Step 4: Navigate to Avatar Characters
From the left sidebar of the Zoice dashboard, click **Avatar Characters** under the Manage section.
 ### Step 5: Click Create New Avatar
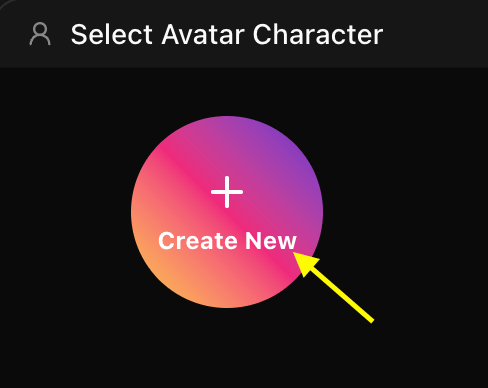
Click the **Create New** button to open the avatar creator tool.
### Step 5: Click Create New Avatar
Click the **Create New** button to open the avatar creator tool.
 ### Step 6: Upload Your Presenter Image and Name Your Avatar
Upload a clear, high-quality presenter image that you want to bring to life.
### Step 6: Upload Your Presenter Image and Name Your Avatar
Upload a clear, high-quality presenter image that you want to bring to life.
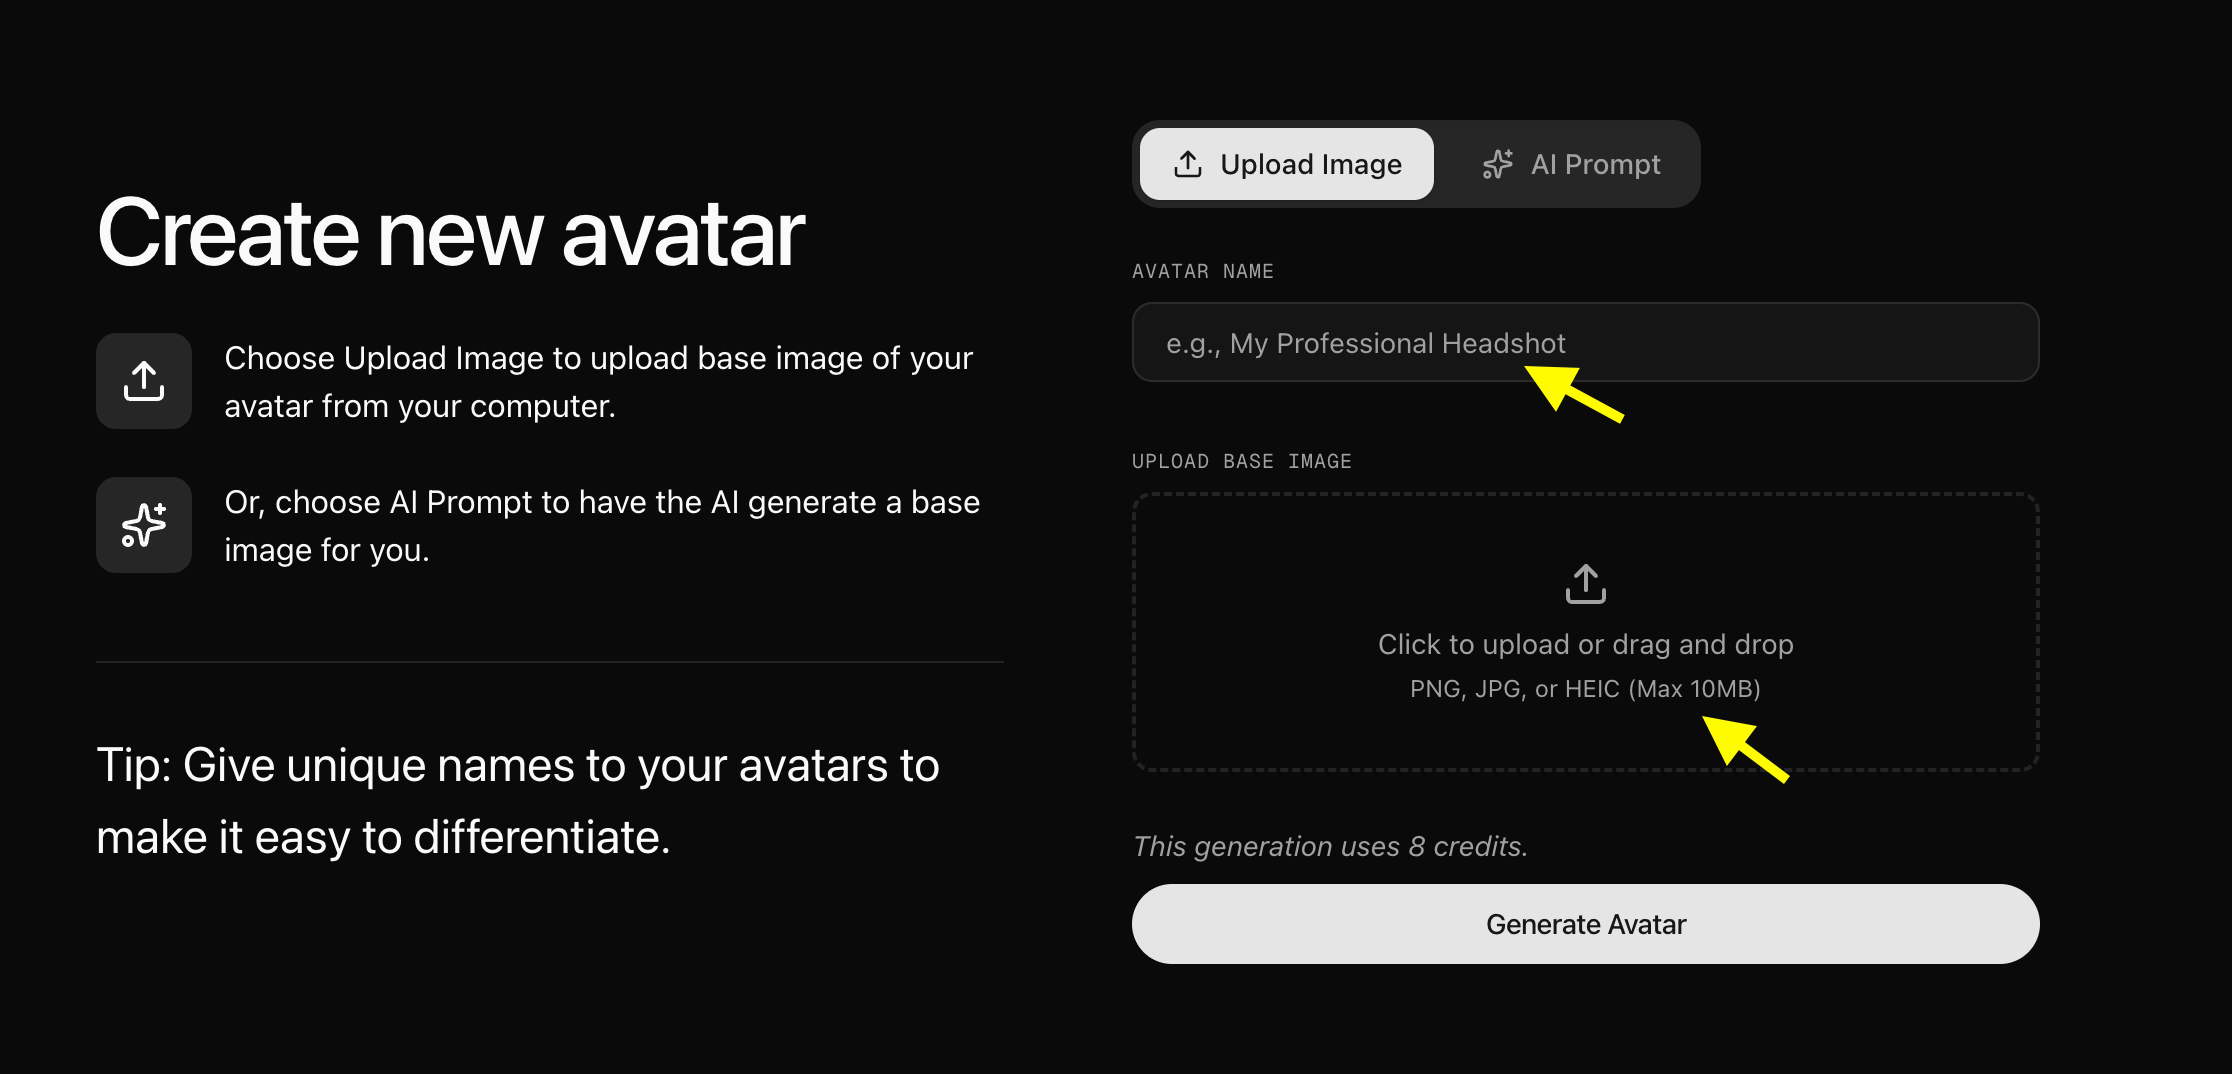 Add an **Avatar Name** to easily identify your avatar later, then click **Generate Avatar** to create your custom AI presenter avatar.
For better results, use an image with:
* Clear face visibility and forward-facing angle
* Good contrast between character and background
* Closed or neutral mouth position
* No blurry or low-quality images
* **Upload Your Image or Generate an Avatar Using AI Prompt**
Zoice gives you two options to create your presenter avatar:
* **Upload Image:** Upload a clear presenter image directly from your device.
* **AI Prompt:** If you don't have an image, select the **AI Prompt** option and describe the presenter you want to create. Zoice will generate a custom AI image based on your prompt.
Add an **Avatar Name** to easily identify your avatar later, then click **Generate Avatar** to create your custom AI presenter avatar.
For better results, use an image with:
* Clear face visibility and forward-facing angle
* Good contrast between character and background
* Closed or neutral mouth position
* No blurry or low-quality images
* **Upload Your Image or Generate an Avatar Using AI Prompt**
Zoice gives you two options to create your presenter avatar:
* **Upload Image:** Upload a clear presenter image directly from your device.
* **AI Prompt:** If you don't have an image, select the **AI Prompt** option and describe the presenter you want to create. Zoice will generate a custom AI image based on your prompt.
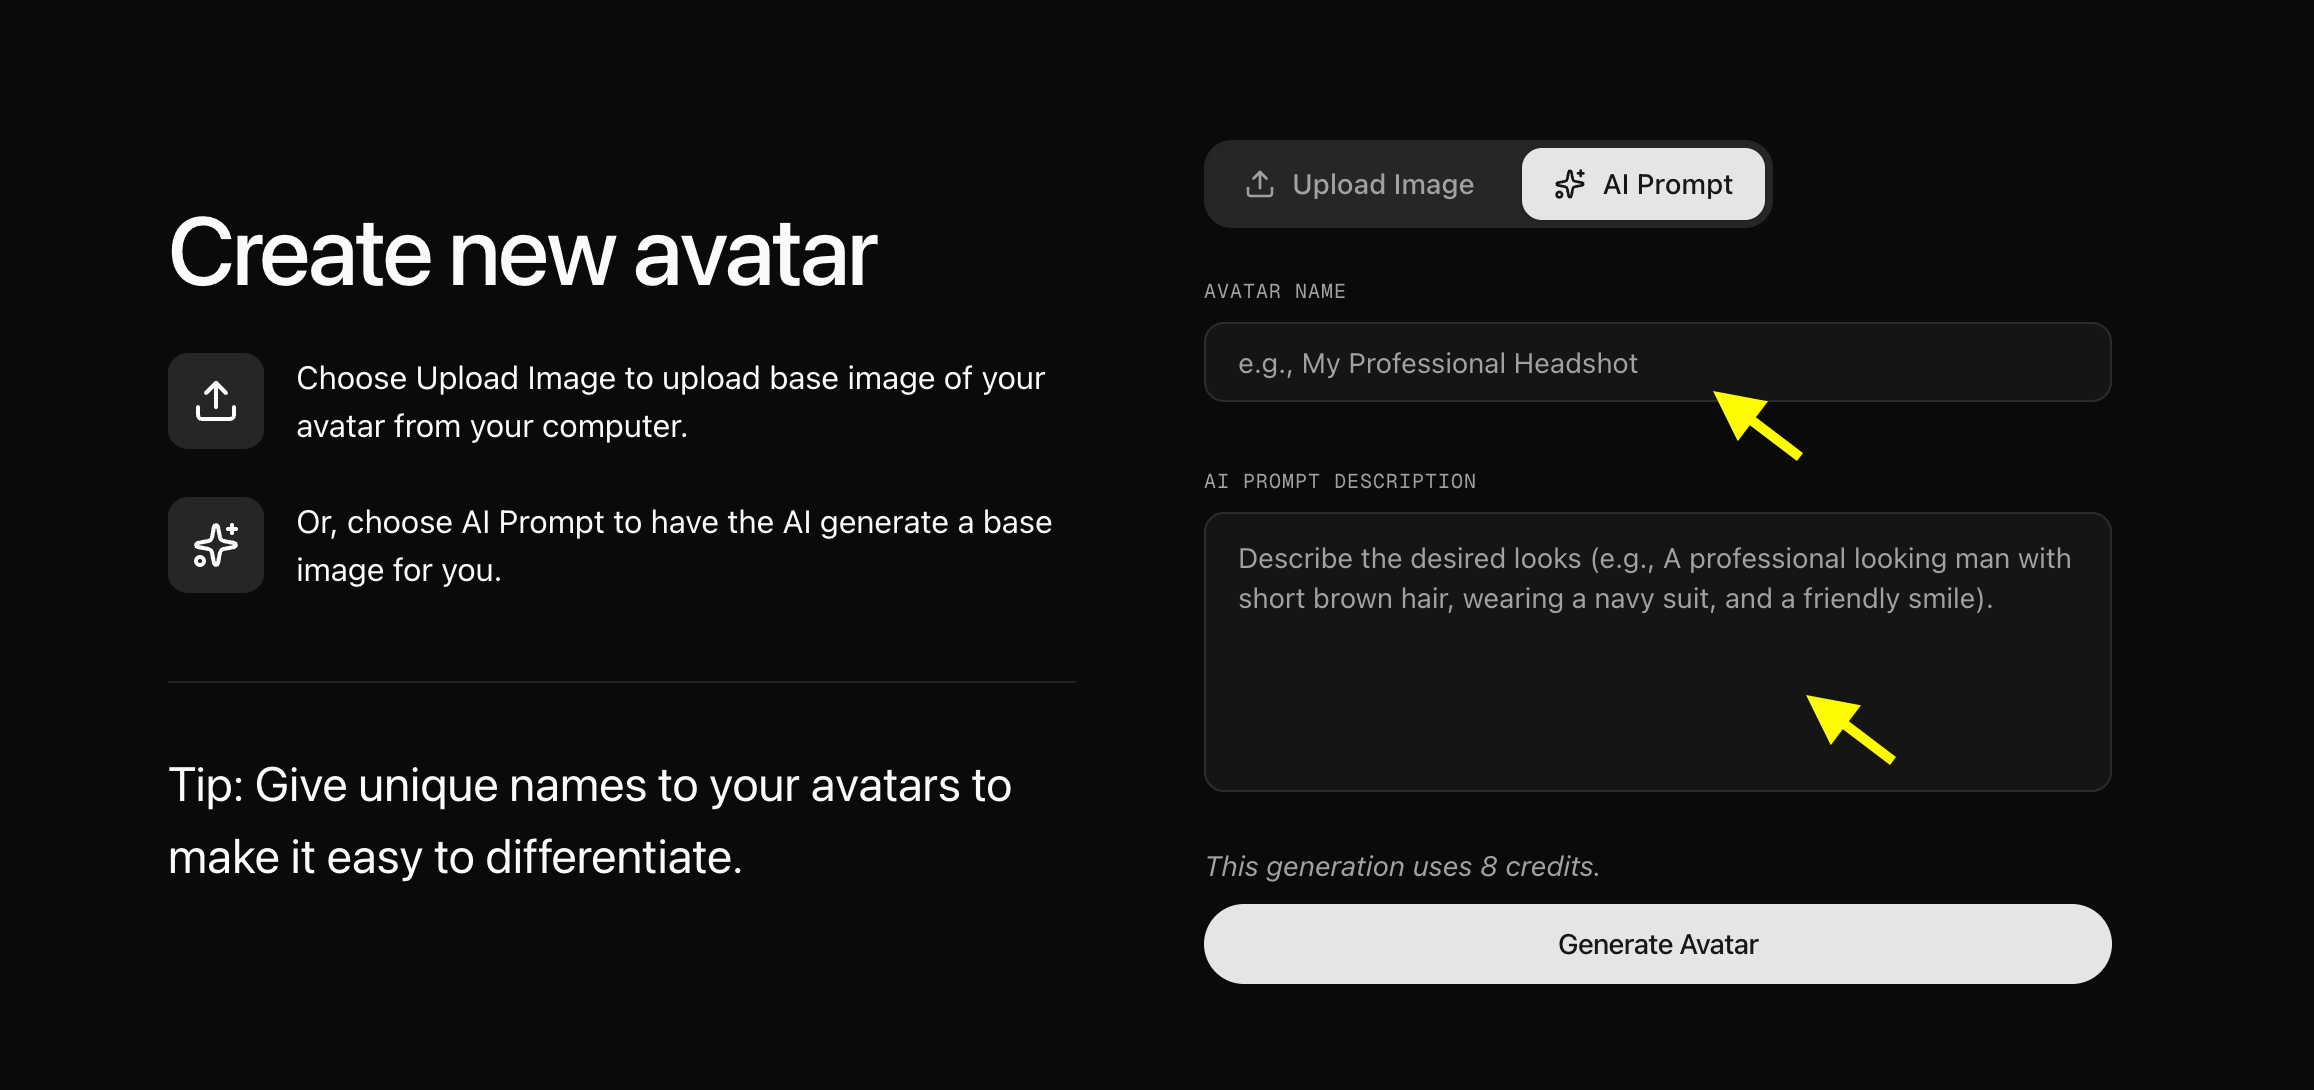 * **We upload the image of our presenter.**
 After adding your image, enter a unique avatar name and click **Generate Avatar**.
### Step 7: Click Generate Video
Once you selected your presenter avatar, click the **Generate Video** button to open the video generation settings panel.
After adding your image, enter a unique avatar name and click **Generate Avatar**.
### Step 7: Click Generate Video
Once you selected your presenter avatar, click the **Generate Video** button to open the video generation settings panel.
 ### Step 8: Add Your Product Script
In the video generation panel, click on the script box. A pop-up window will appear where you write your product's promotional script, select the voice model, and set audio tags (like emotion, accent, and delivery). Click **Add Script** once ready.
### Step 8: Add Your Product Script
In the video generation panel, click on the script box. A pop-up window will appear where you write your product's promotional script, select the voice model, and set audio tags (like emotion, accent, and delivery). Click **Add Script** once ready.
 * **Once the window pops up, write your product script in the box, customize your voice tags, and click Add Script.**
 ### Step 9: Click on Select Voice
After adding the script, click on the **Select Voice** option to see public voices or upload your own custom voice for the presenter.
### Step 9: Click on Select Voice
After adding the script, click on the **Select Voice** option to see public voices or upload your own custom voice for the presenter.
 ### Step 10: Choose a Voice for Your Presenter Avatar
Browse through the available voices and click on one that matches your brand and product's style. You can preview each voice to make sure it sounds professional.
### Step 10: Choose a Voice for Your Presenter Avatar
Browse through the available voices and click on one that matches your brand and product's style. You can preview each voice to make sure it sounds professional.
 ### Step 11: Choose Output Settings
After selecting a voice, customize the video output settings based on your platform needs:
* **Aspect Ratio:** 16:9 for YouTube/website embeds, 9:16 for TikTok/Reels, 1:1 for social feeds.
* **Resolution:** Select up to 4K for high-quality production.
### Step 11: Choose Output Settings
After selecting a voice, customize the video output settings based on your platform needs:
* **Aspect Ratio:** 16:9 for YouTube/website embeds, 9:16 for TikTok/Reels, 1:1 for social feeds.
* **Resolution:** Select up to 4K for high-quality production.
 ### Step 12: Add an Action Prompt
Click on **Action Prompt** to define the expressions and gestures of your presenter avatar. Select or write a custom prompt that matches the energetic tone of a product pitch.
### Step 12: Add an Action Prompt
Click on **Action Prompt** to define the expressions and gestures of your presenter avatar. Select or write a custom prompt that matches the energetic tone of a product pitch.
 * **We have written an action prompt for our product presenter avatar.**
 ### Step 13: Generate Your Product Showcase AI Avatar Video
Once all your settings are ready, click the **Generate** button. Zoice will process your script and presenter avatar to create the talking video.
### Step 13: Generate Your Product Showcase AI Avatar Video
Once all your settings are ready, click the **Generate** button. Zoice will process your script and presenter avatar to create the talking video.
 ### Step 14: Preview the Audio and Generate the Video
Before rendering the final video, Zoice creates an audio preview. Listen carefully to check:
* Voice clarity and pronunciation of product names
* Timing and pacing of the sales pitch
* Overall tone and excitement level
### Step 14: Preview the Audio and Generate the Video
Before rendering the final video, Zoice creates an audio preview. Listen carefully to check:
* Voice clarity and pronunciation of product names
* Timing and pacing of the sales pitch
* Overall tone and excitement level
 If everything sounds good, click **Generate Avatar Video** to create your final product showcase video.
### Step 15: Wait for Your Presenter Avatar Video to Process
Zoice will now process and render your product marketing video. Processing time may vary depending on script length and selected resolution.
If everything sounds good, click **Generate Avatar Video** to create your final product showcase video.
### Step 15: Wait for Your Presenter Avatar Video to Process
Zoice will now process and render your product marketing video. Processing time may vary depending on script length and selected resolution.
 ### Step 16: Preview and Download Your Product Video
Once your video is ready, preview it to confirm the lip-sync quality, voice match, and overall output. Click **Download** to save it.
### Step 16: Preview and Download Your Product Video
Once your video is ready, preview it to confirm the lip-sync quality, voice match, and overall output. Click **Download** to save it.
 ## Example Input Image, Action Prompt & Output Video
Here is an example setup for generating a product showcase AI avatar video.
### Used Image
### Used Script
```
Introducing the all-new Zoice Smartwatch. With active health tracking, a stunning seven-day battery life, and a sleek waterproof design, it is the ultimate companion for your active lifestyle. Order yours today and get twenty percent off your first purchase! [excited][confident]
```
### Used Action Prompt
```
The presenter stands in front of a modern studio background, pointing slightly forward and smiling warmly while presenting the smartwatch benefits.
```
### Output Result Video
Below is the rendered product showcase AI avatar video:
> \[!NOTE]
> Just a little bit of editing and boom, your AI product presenter avatar is ready to rock!
## Final Words
Creating a product marketing video with Zoice is a fast and simple process. By choosing a presenter avatar, writing a compelling product pitch, and letting AI handle the animations and voice-over, you can produce professional marketing videos in minutes.
Whether you want to create social media ads, landing page product explainers, or email marketing content, Zoice has the tools you need to bring your brand to life.
## Next Steps
Learn how to make a talking pet avatar video.
Make your avatar sing with vocal tracks.
## Example Input Image, Action Prompt & Output Video
Here is an example setup for generating a product showcase AI avatar video.
### Used Image
### Used Script
```
Introducing the all-new Zoice Smartwatch. With active health tracking, a stunning seven-day battery life, and a sleek waterproof design, it is the ultimate companion for your active lifestyle. Order yours today and get twenty percent off your first purchase! [excited][confident]
```
### Used Action Prompt
```
The presenter stands in front of a modern studio background, pointing slightly forward and smiling warmly while presenting the smartwatch benefits.
```
### Output Result Video
Below is the rendered product showcase AI avatar video:
> \[!NOTE]
> Just a little bit of editing and boom, your AI product presenter avatar is ready to rock!
## Final Words
Creating a product marketing video with Zoice is a fast and simple process. By choosing a presenter avatar, writing a compelling product pitch, and letting AI handle the animations and voice-over, you can produce professional marketing videos in minutes.
Whether you want to create social media ads, landing page product explainers, or email marketing content, Zoice has the tools you need to bring your brand to life.
## Next Steps
Learn how to make a talking pet avatar video.
Make your avatar sing with vocal tracks.