> ## Documentation Index
> Fetch the complete documentation index at: https://docs.zoice.com/llms.txt
> Use this file to discover all available pages before exploring further.
# How to Create an Avatar Using the Zoice Avatar X Photo-to-Video
> Learn how to create a talking AI avatar video from a single photo using Zoice Avatar X Photo-to-Video. No filming, no recording studio — just upload a photo, add a script, and generate a realistic avatar video in minutes.
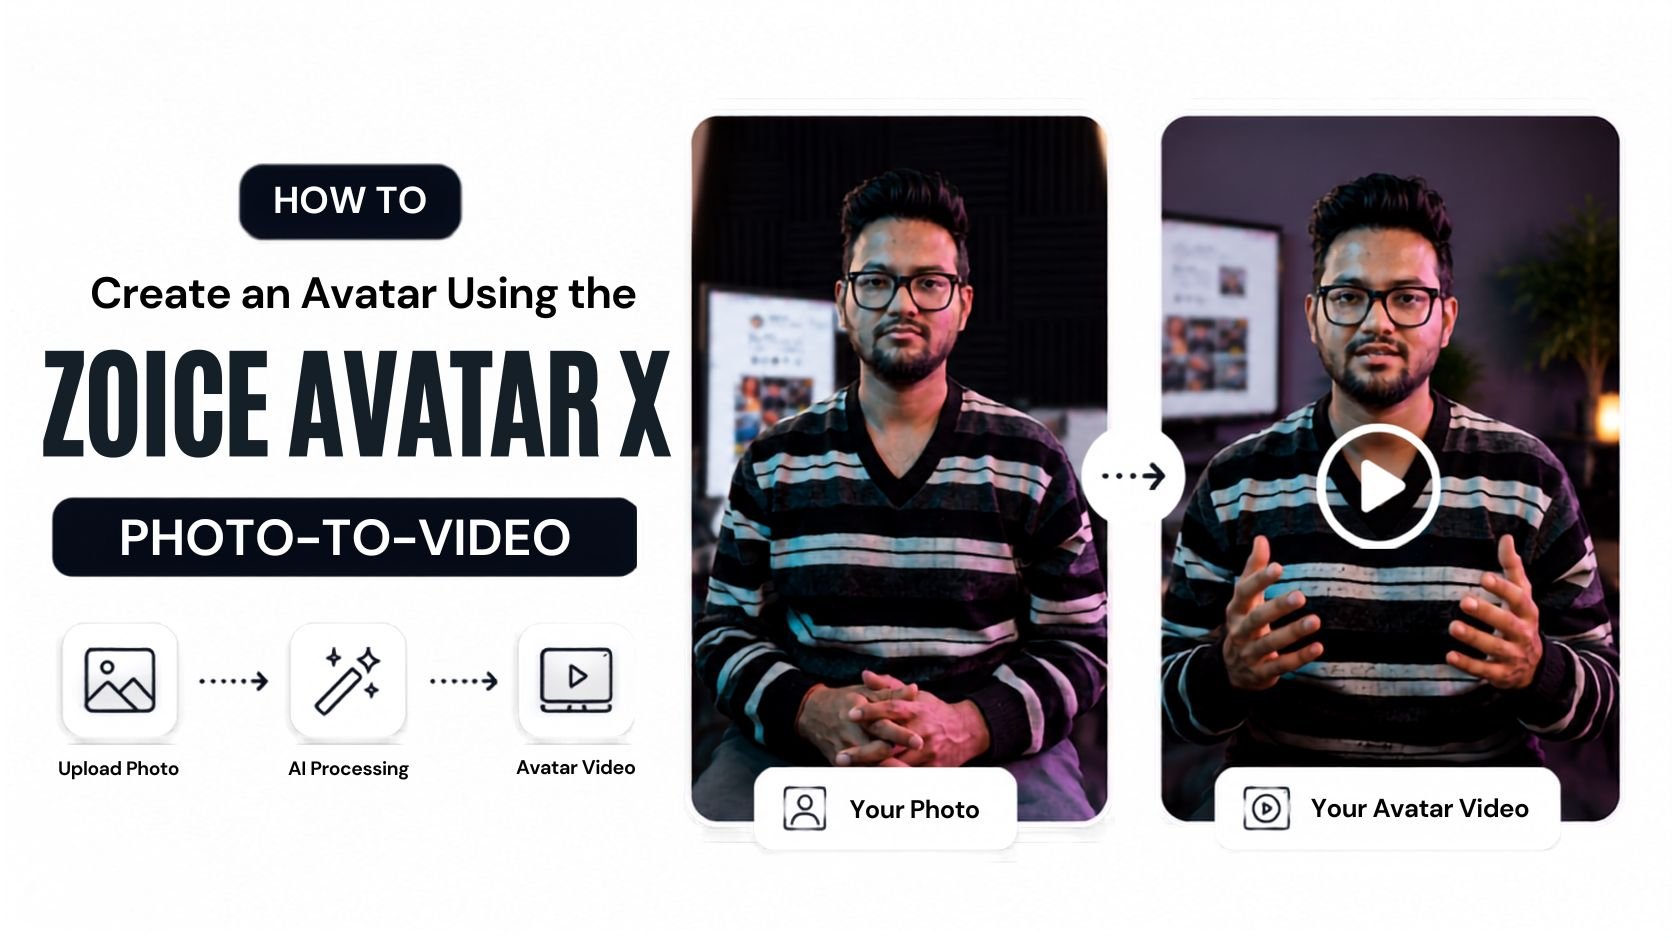 One of the most powerful features of Zoice Avatar X is its **Photo-to-Video** capability. Instead of recording yourself on camera, you simply upload a still photograph — and Avatar X animates it into a fully talking, expressive video avatar.
No recording equipment. No studio setup. No retakes. Just a single photo and a script, and you get a realistic avatar video that speaks your words with natural lip-syncing, head movement, and facial expressions.
This makes Photo-to-Video ideal for anyone who wants to create professional AI avatar videos quickly — whether you are a content creator building a personal brand, a marketer producing campaign videos, an educator making course content, or a business owner creating product walkthroughs.
In this article, you will learn how to create an avatar using the Zoice Avatar X Photo-to-Video feature, step by step.
## What is Avatar X Photo-to-Video?
Avatar X Photo-to-Video is a feature within Zoice that takes a single still image of a person and uses the Avatar X AI model to generate a realistic, animated video where the subject in the photo speaks your script.
The Avatar X model analyzes the photo to understand the face structure, expressions, and lighting — then generates fluid, natural motion including:
* Accurate lip-syncing that matches every word in your script
* Natural head tilts and micro-movements that make the avatar feel alive
* Realistic blinking and subtle facial expressions
* Smooth, cinematic video quality up to 4K resolution
Unlike traditional video avatars that require you to film yourself, Avatar X Photo-to-Video works from a completely static image — making it one of the fastest ways to produce talking avatar videos.
## How to Create an Avatar Video Using Avatar X Photo-to-Video
Follow the steps below to create your first avatar video using a photo and Zoice Avatar X.
### Step 1: Visit Zoice.com and Sign In
Go to [Zoice.com](https://zoice.com) in your web browser and click **Sign In** in the top-right corner. Enter your email and password, or use **Sign in with Google** for faster access.
One of the most powerful features of Zoice Avatar X is its **Photo-to-Video** capability. Instead of recording yourself on camera, you simply upload a still photograph — and Avatar X animates it into a fully talking, expressive video avatar.
No recording equipment. No studio setup. No retakes. Just a single photo and a script, and you get a realistic avatar video that speaks your words with natural lip-syncing, head movement, and facial expressions.
This makes Photo-to-Video ideal for anyone who wants to create professional AI avatar videos quickly — whether you are a content creator building a personal brand, a marketer producing campaign videos, an educator making course content, or a business owner creating product walkthroughs.
In this article, you will learn how to create an avatar using the Zoice Avatar X Photo-to-Video feature, step by step.
## What is Avatar X Photo-to-Video?
Avatar X Photo-to-Video is a feature within Zoice that takes a single still image of a person and uses the Avatar X AI model to generate a realistic, animated video where the subject in the photo speaks your script.
The Avatar X model analyzes the photo to understand the face structure, expressions, and lighting — then generates fluid, natural motion including:
* Accurate lip-syncing that matches every word in your script
* Natural head tilts and micro-movements that make the avatar feel alive
* Realistic blinking and subtle facial expressions
* Smooth, cinematic video quality up to 4K resolution
Unlike traditional video avatars that require you to film yourself, Avatar X Photo-to-Video works from a completely static image — making it one of the fastest ways to produce talking avatar videos.
## How to Create an Avatar Video Using Avatar X Photo-to-Video
Follow the steps below to create your first avatar video using a photo and Zoice Avatar X.
### Step 1: Visit Zoice.com and Sign In
Go to [Zoice.com](https://zoice.com) in your web browser and click **Sign In** in the top-right corner. Enter your email and password, or use **Sign in with Google** for faster access.
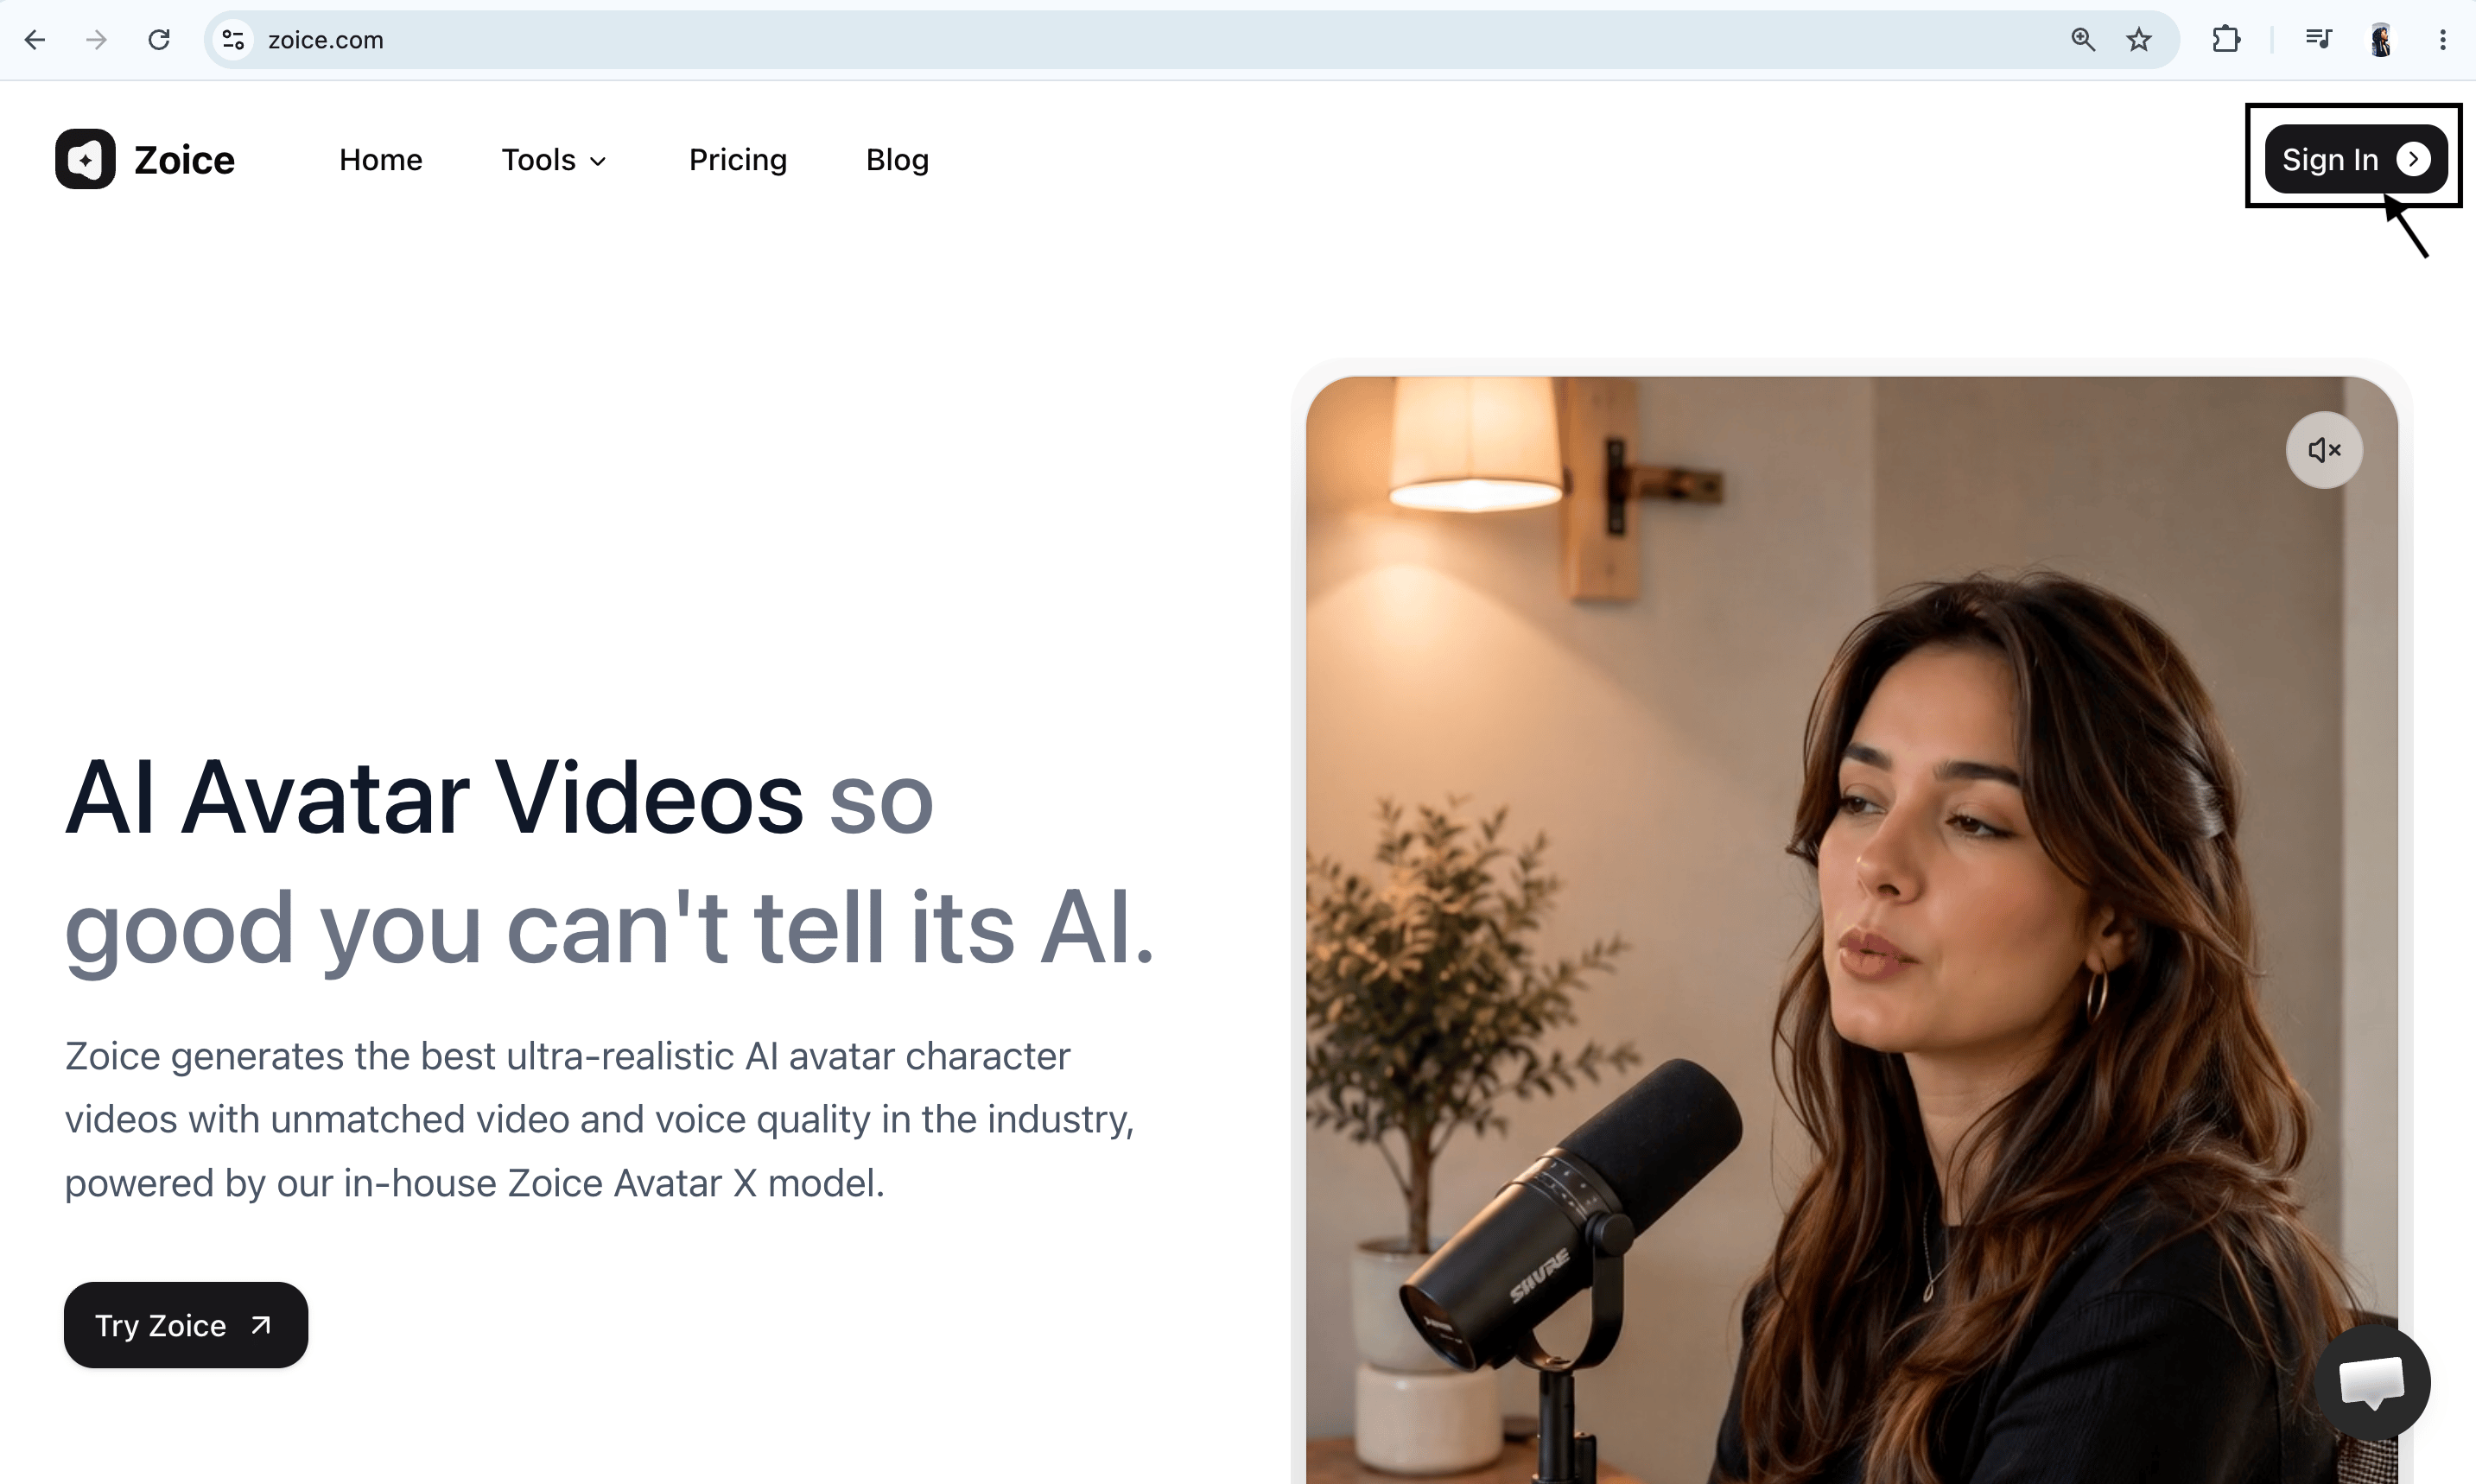 If you are new to Zoice, click **Sign Up**, fill in your name, email, and password, and you will have access to the dashboard in under a minute.
 ### Step 2: Navigate to Avatar Characters
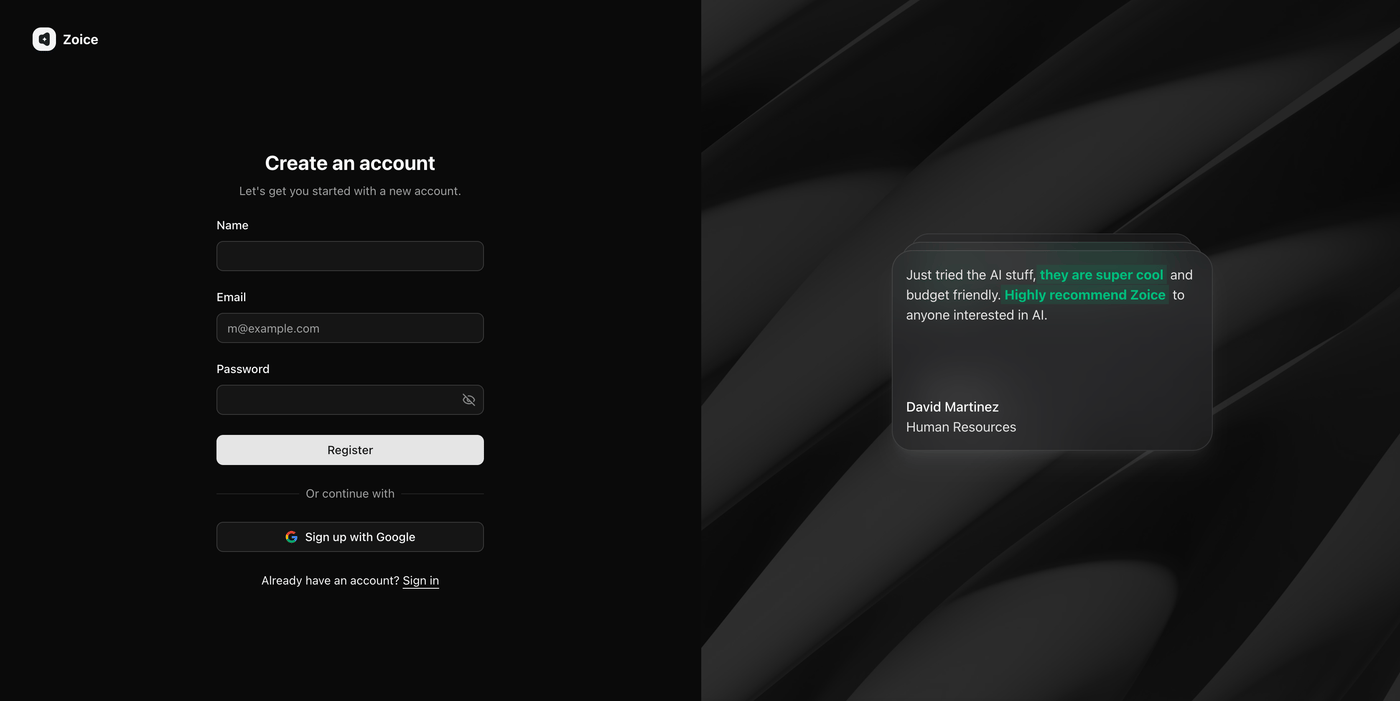
From the Zoice dashboard, click on **Avatar Characters** in the left sidebar.
### Step 2: Navigate to Avatar Characters
From the Zoice dashboard, click on **Avatar Characters** in the left sidebar.
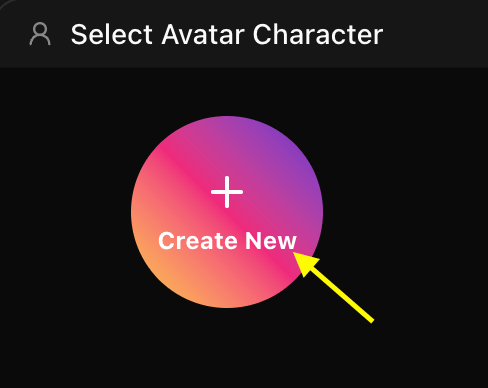
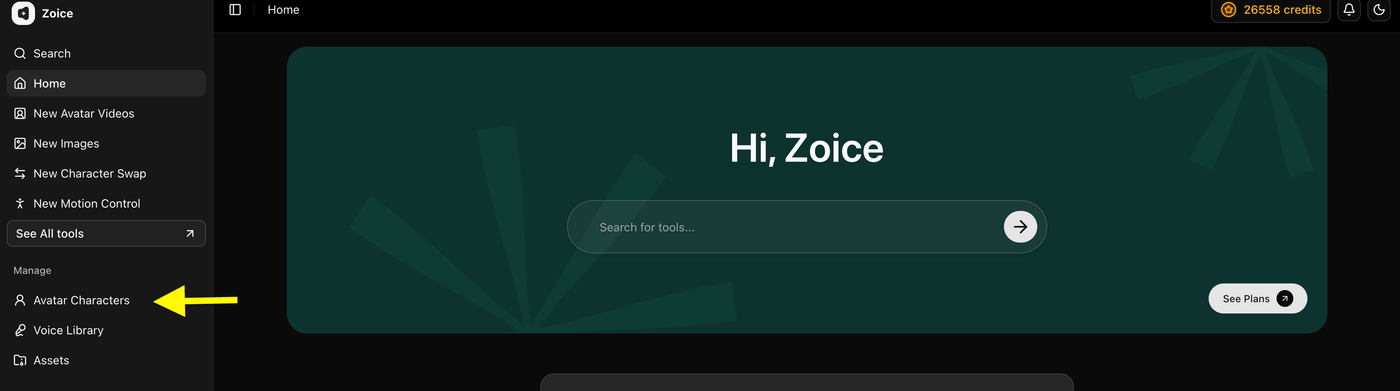 This section is your avatar library, where you can create, manage, and reuse all of your Avatar X profiles. Click **Create New** to begin.
 ### Step 3: Upload Your Photo
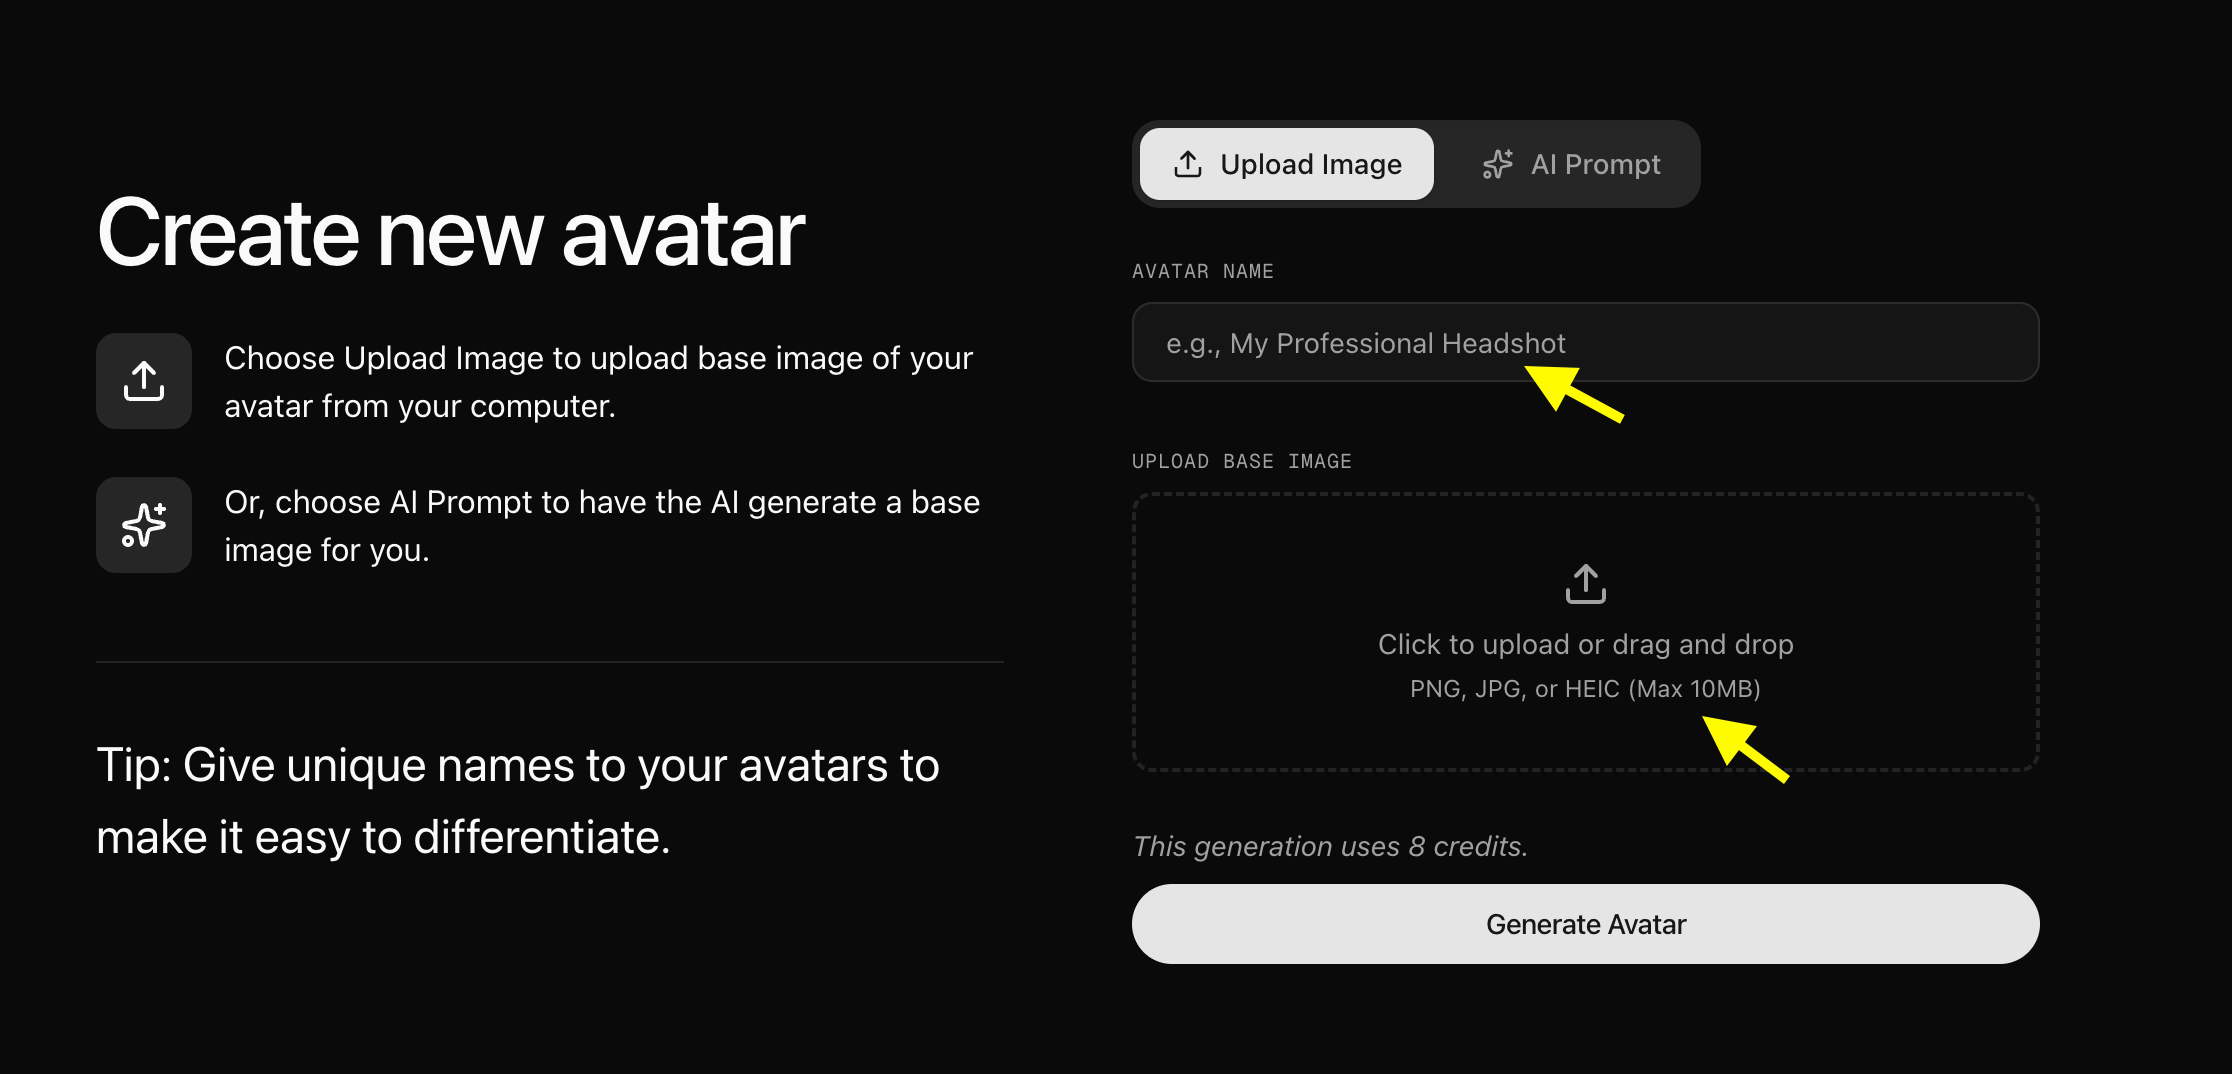
On the avatar creation page, select the **Upload Image** option. Upload a clear, high-quality photo of the person you want to animate. This can be a photo of yourself, a colleague, a spokesperson, or any other person with appropriate permissions.
### Step 3: Upload Your Photo
On the avatar creation page, select the **Upload Image** option. Upload a clear, high-quality photo of the person you want to animate. This can be a photo of yourself, a colleague, a spokesperson, or any other person with appropriate permissions.
 For the best Photo-to-Video results with Avatar X:
* Use a front-facing photo with the face clearly visible
* Choose an image with good, even lighting and no harsh shadows
* Avoid photos with sunglasses, face masks, or heavy filters
* Use a clean, simple background — a plain wall or studio backdrop works best
* Higher resolution images (at least 500x500 pixels) produce better animation quality
Give your avatar a name — something descriptive like "Product Demo Avatar" or "Course Presenter" — so you can find it easily later.
### Step 4: Generate Your Avatar Profile
Once you have uploaded your photo and named your avatar, click **Generate Avatar**. Zoice Avatar X will analyze the face in your photo and create an animated avatar profile from it.
For the best Photo-to-Video results with Avatar X:
* Use a front-facing photo with the face clearly visible
* Choose an image with good, even lighting and no harsh shadows
* Avoid photos with sunglasses, face masks, or heavy filters
* Use a clean, simple background — a plain wall or studio backdrop works best
* Higher resolution images (at least 500x500 pixels) produce better animation quality
Give your avatar a name — something descriptive like "Product Demo Avatar" or "Course Presenter" — so you can find it easily later.
### Step 4: Generate Your Avatar Profile
Once you have uploaded your photo and named your avatar, click **Generate Avatar**. Zoice Avatar X will analyze the face in your photo and create an animated avatar profile from it.
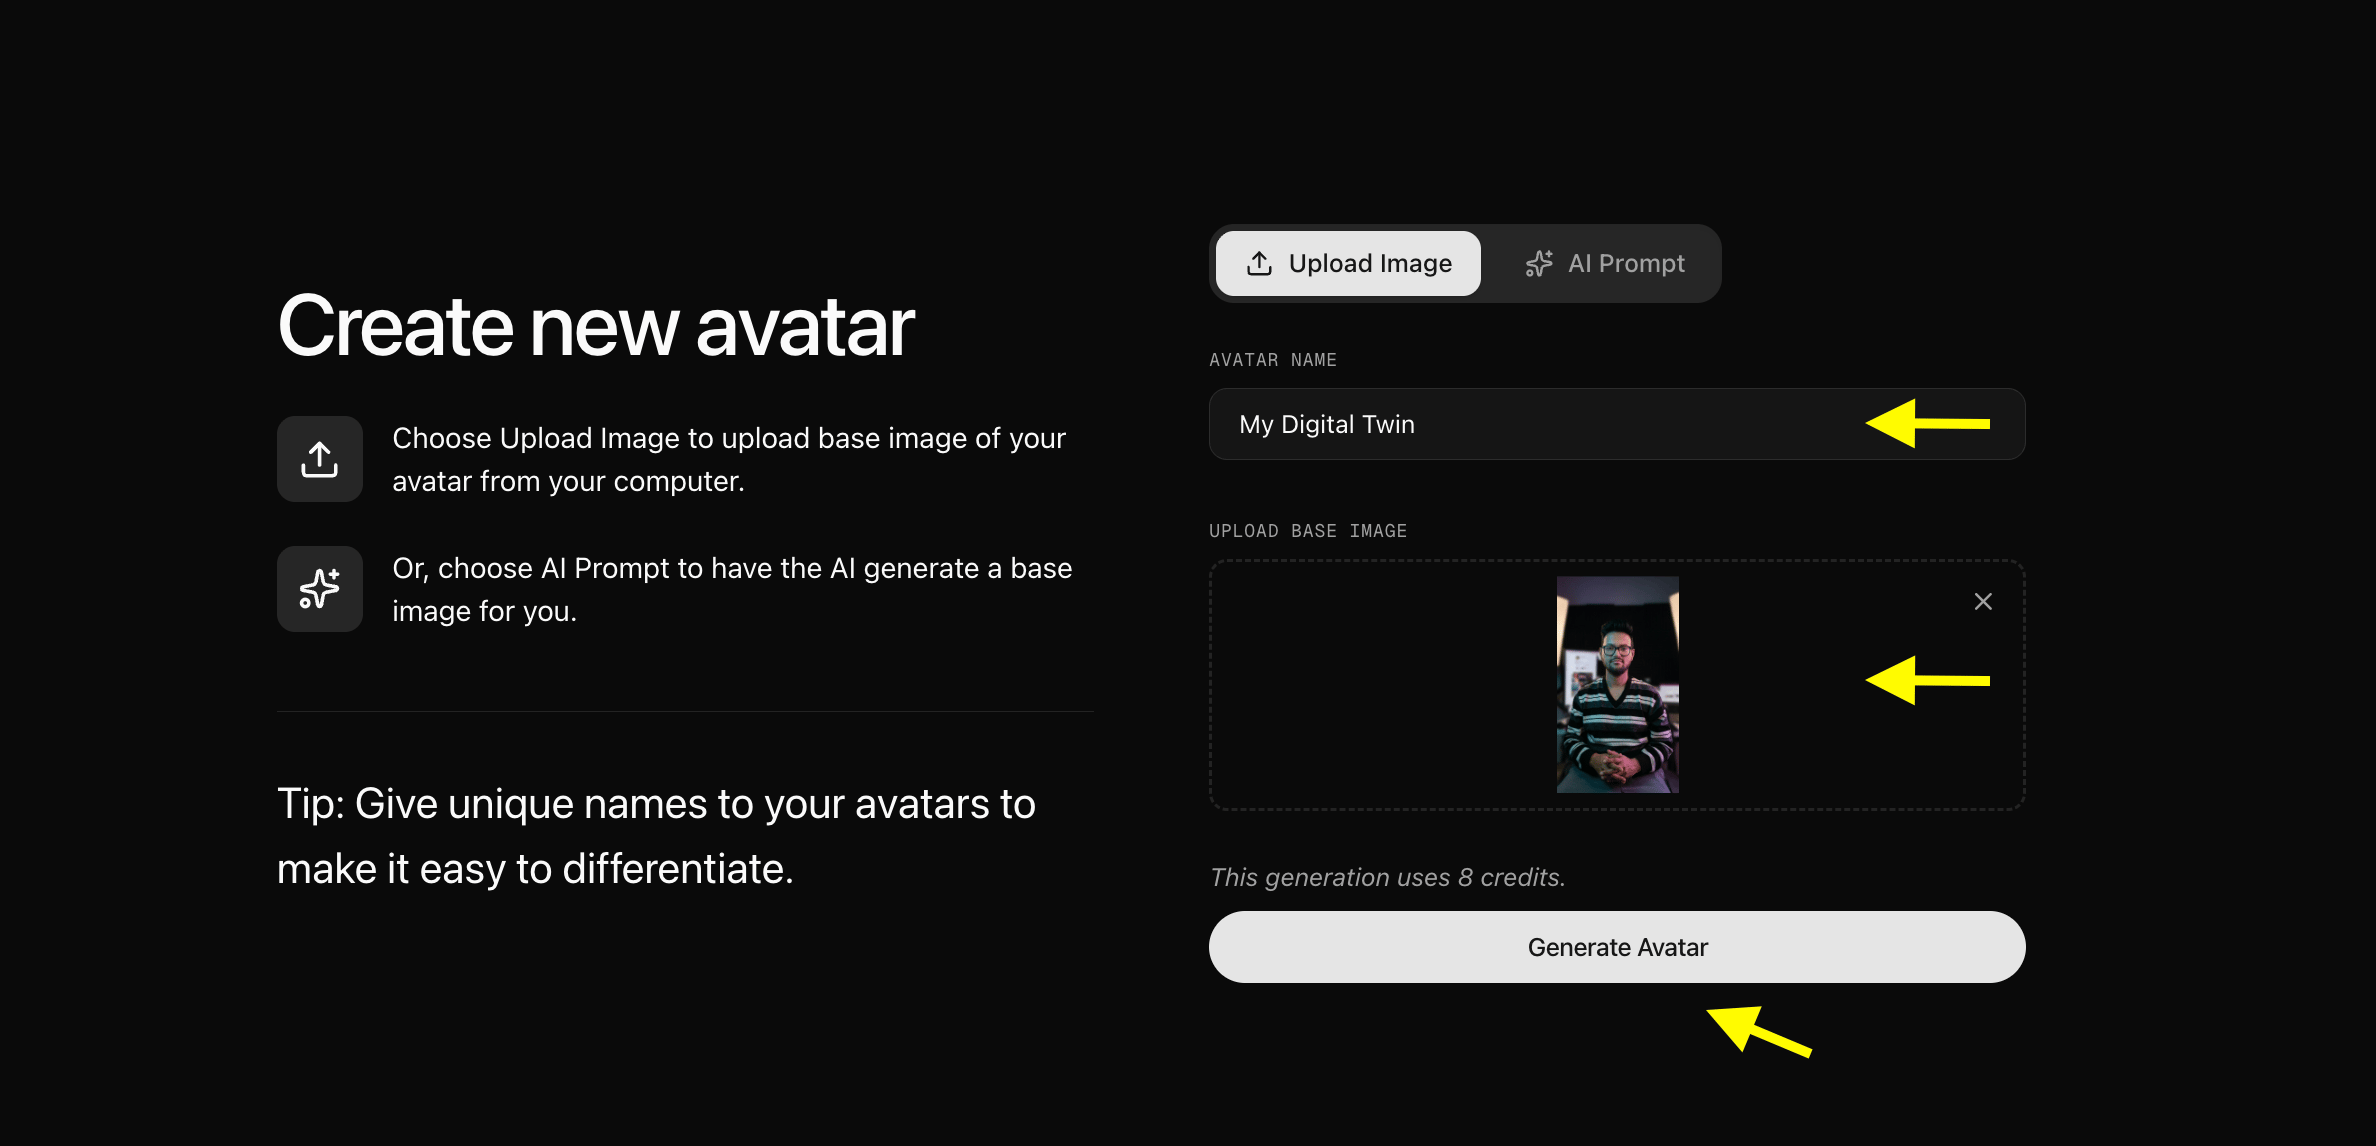 This process typically takes just a few seconds. Once done, your new avatar will appear in your Avatar Characters library.
### Step 5: Configure Avatar Settings
For better animation quality, click **Avatar Setting** after your avatar is created. Fill in the details that help Avatar X calibrate the output:
This process typically takes just a few seconds. Once done, your new avatar will appear in your Avatar Characters library.
### Step 5: Configure Avatar Settings
For better animation quality, click **Avatar Setting** after your avatar is created. Fill in the details that help Avatar X calibrate the output:
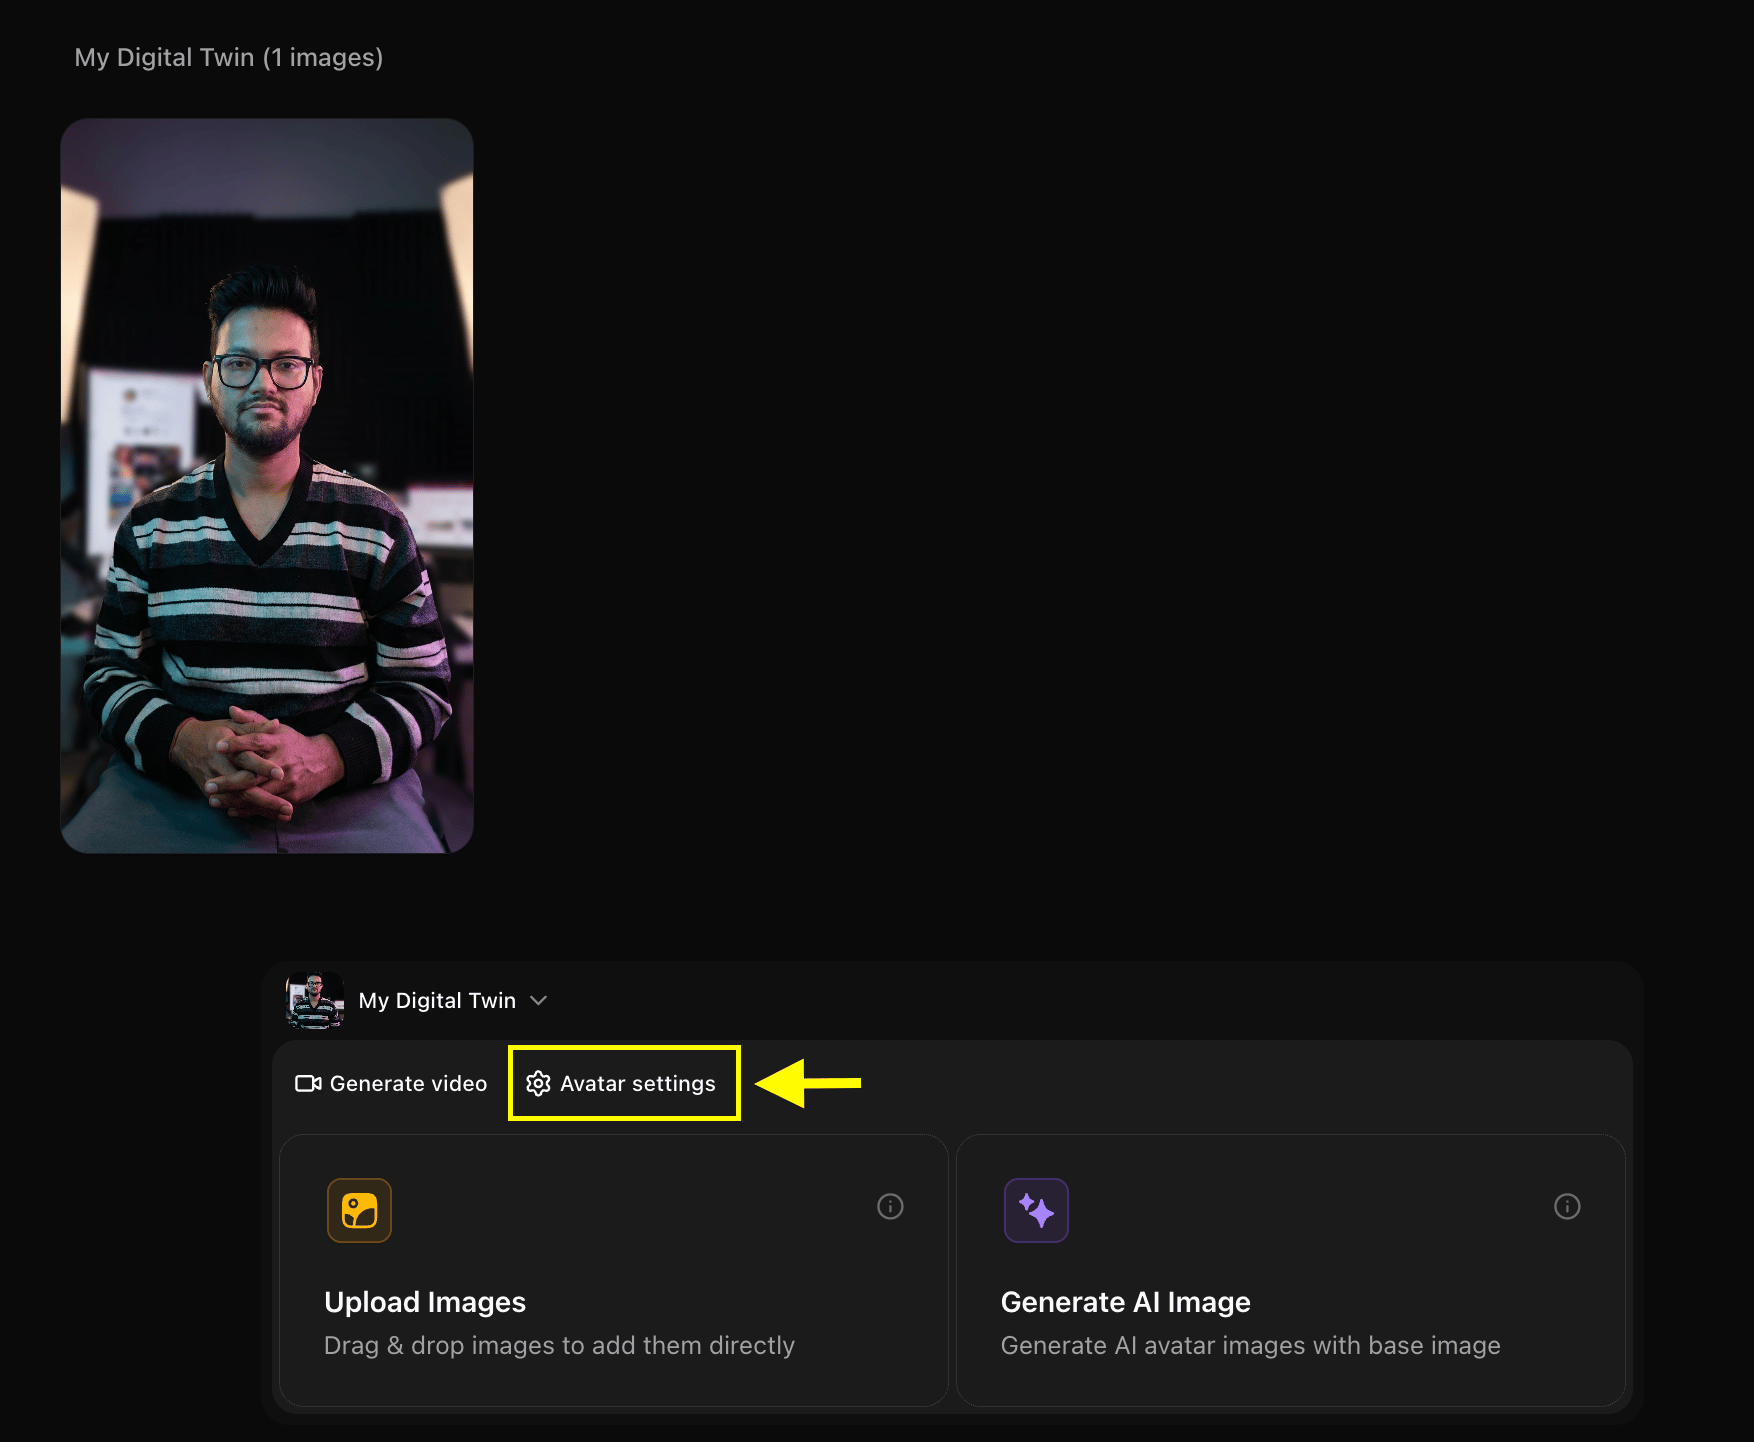
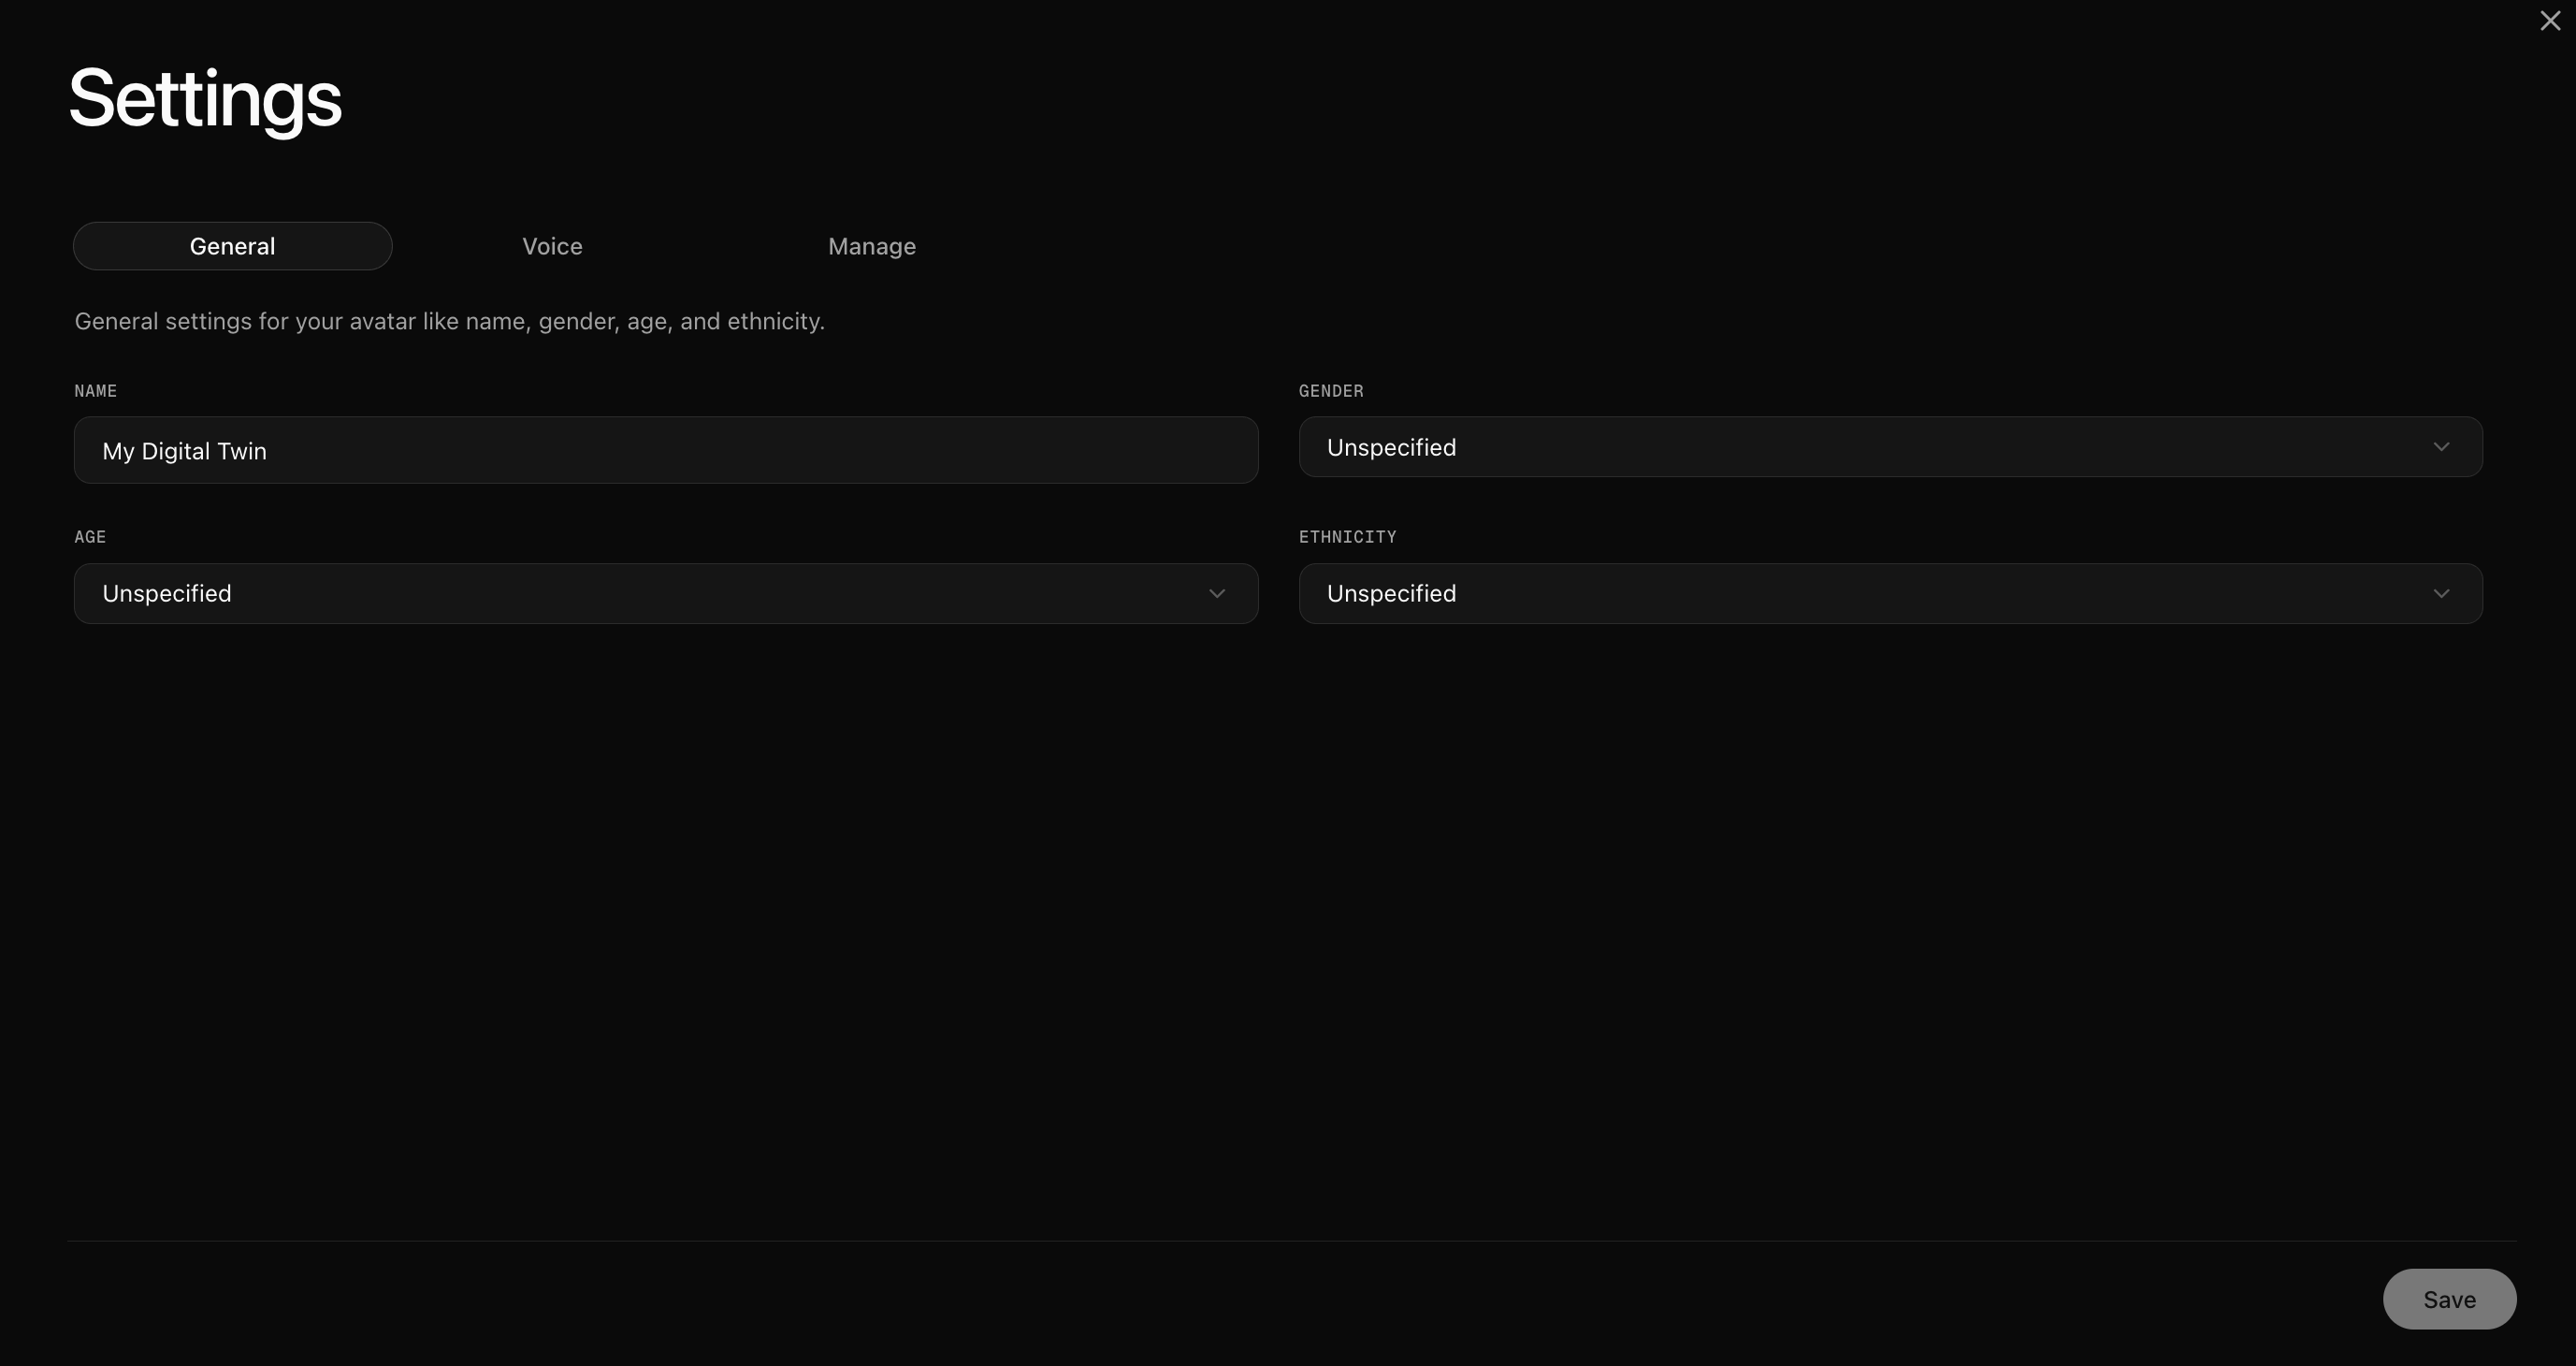 * **Avatar Name:** A label for this avatar profile
* **Gender:** Male or Female
* **Age:** Young Adult, Adult, or Senior
* **Ethnicity:** Helps Avatar X render expressions and skin tone more accurately
Once saved, close the settings window.
### Step 6: Select Your Avatar and Click Generate Video
Back in the Avatar Characters library, click on the avatar you just created to select it.
* **Avatar Name:** A label for this avatar profile
* **Gender:** Male or Female
* **Age:** Young Adult, Adult, or Senior
* **Ethnicity:** Helps Avatar X render expressions and skin tone more accurately
Once saved, close the settings window.
### Step 6: Select Your Avatar and Click Generate Video
Back in the Avatar Characters library, click on the avatar you just created to select it.
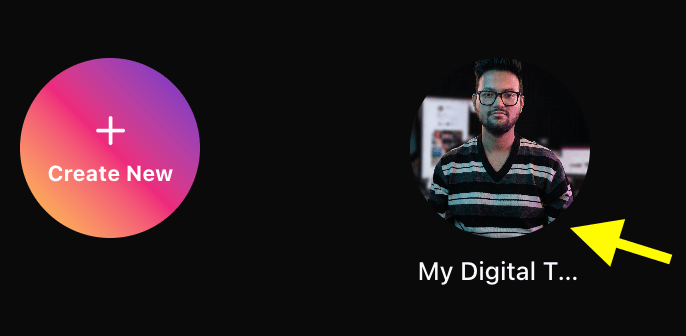 Then click **Generate Video** to open the Avatar X video creation workspace.
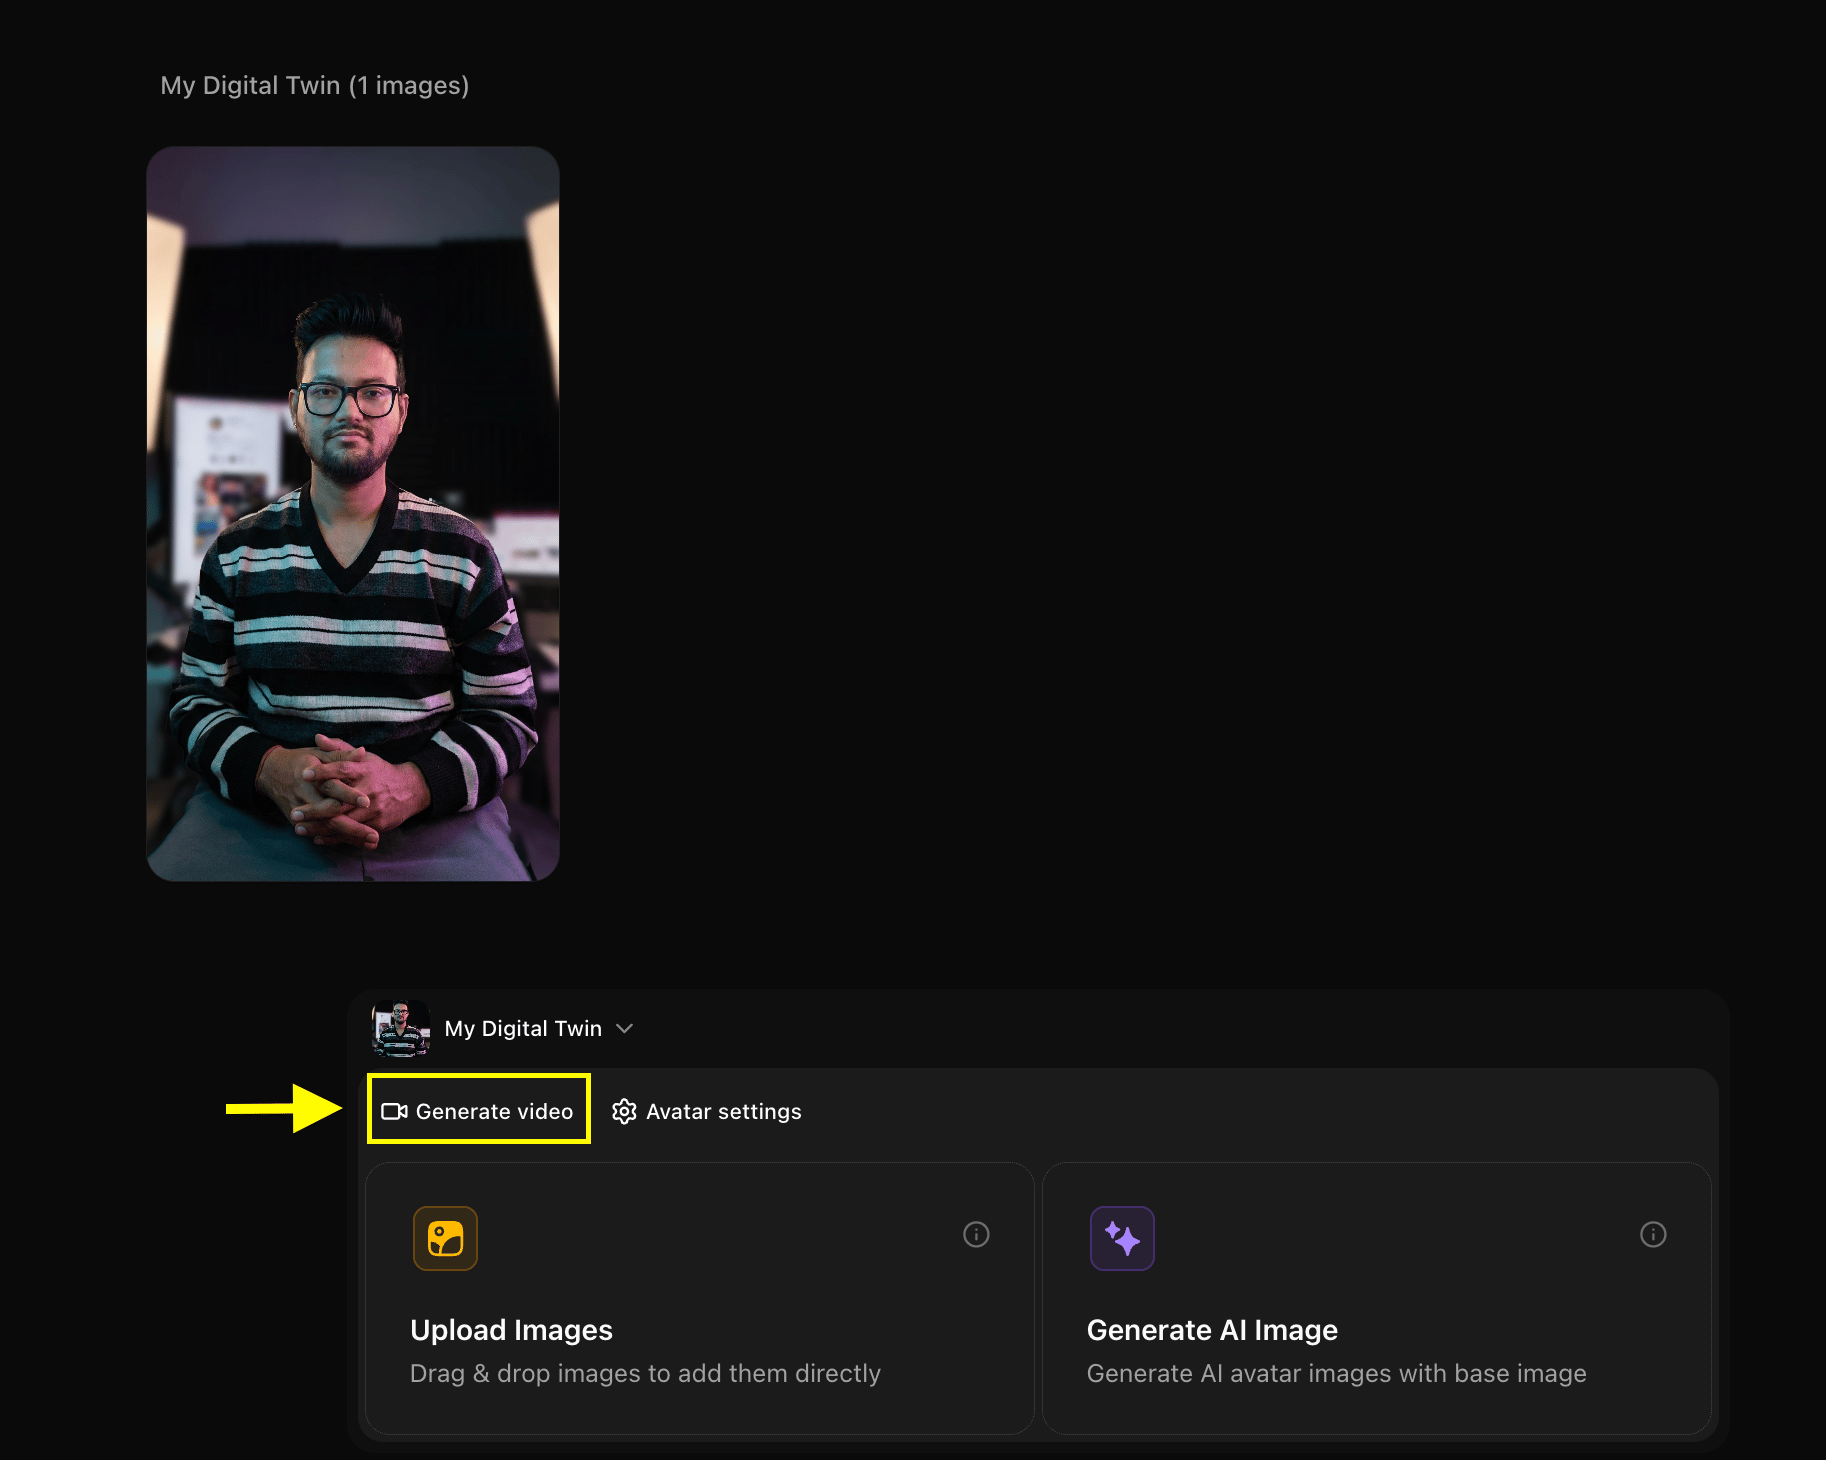 ### Step 7: Add Your Script
In the video creation workspace, click on the **Script Box**. A popup will appear where you can type or paste the text that your avatar will speak.
### Step 7: Add Your Script
In the video creation workspace, click on the **Script Box**. A popup will appear where you can type or paste the text that your avatar will speak.
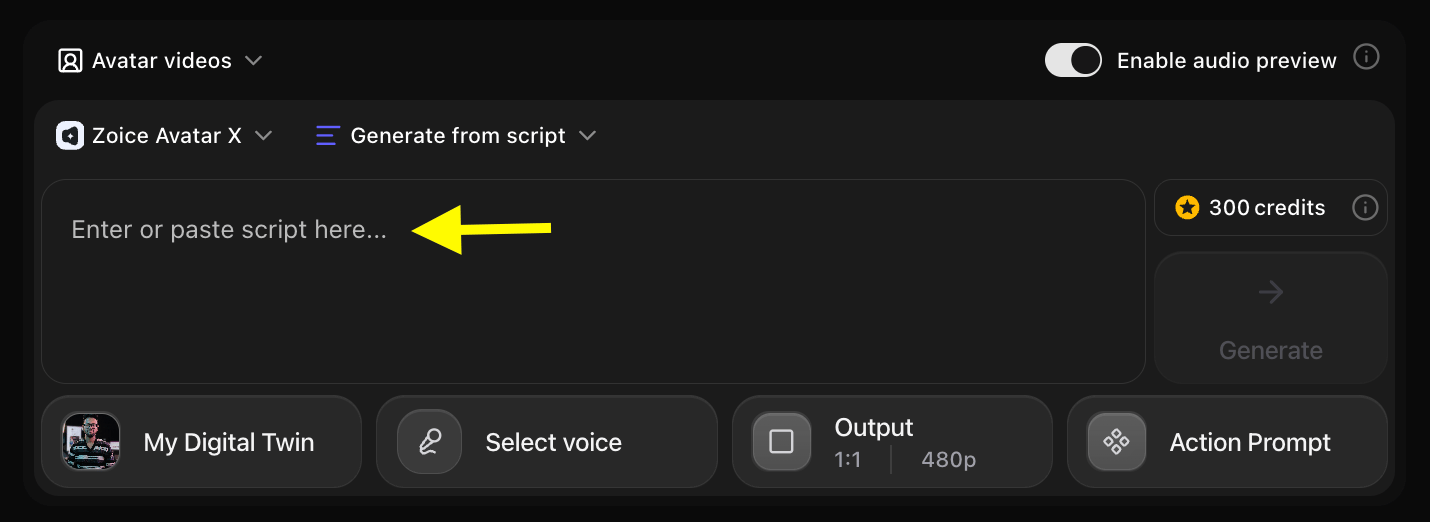 Write your script naturally — the way you would actually say it out loud. Then click **Add Script** when finished.
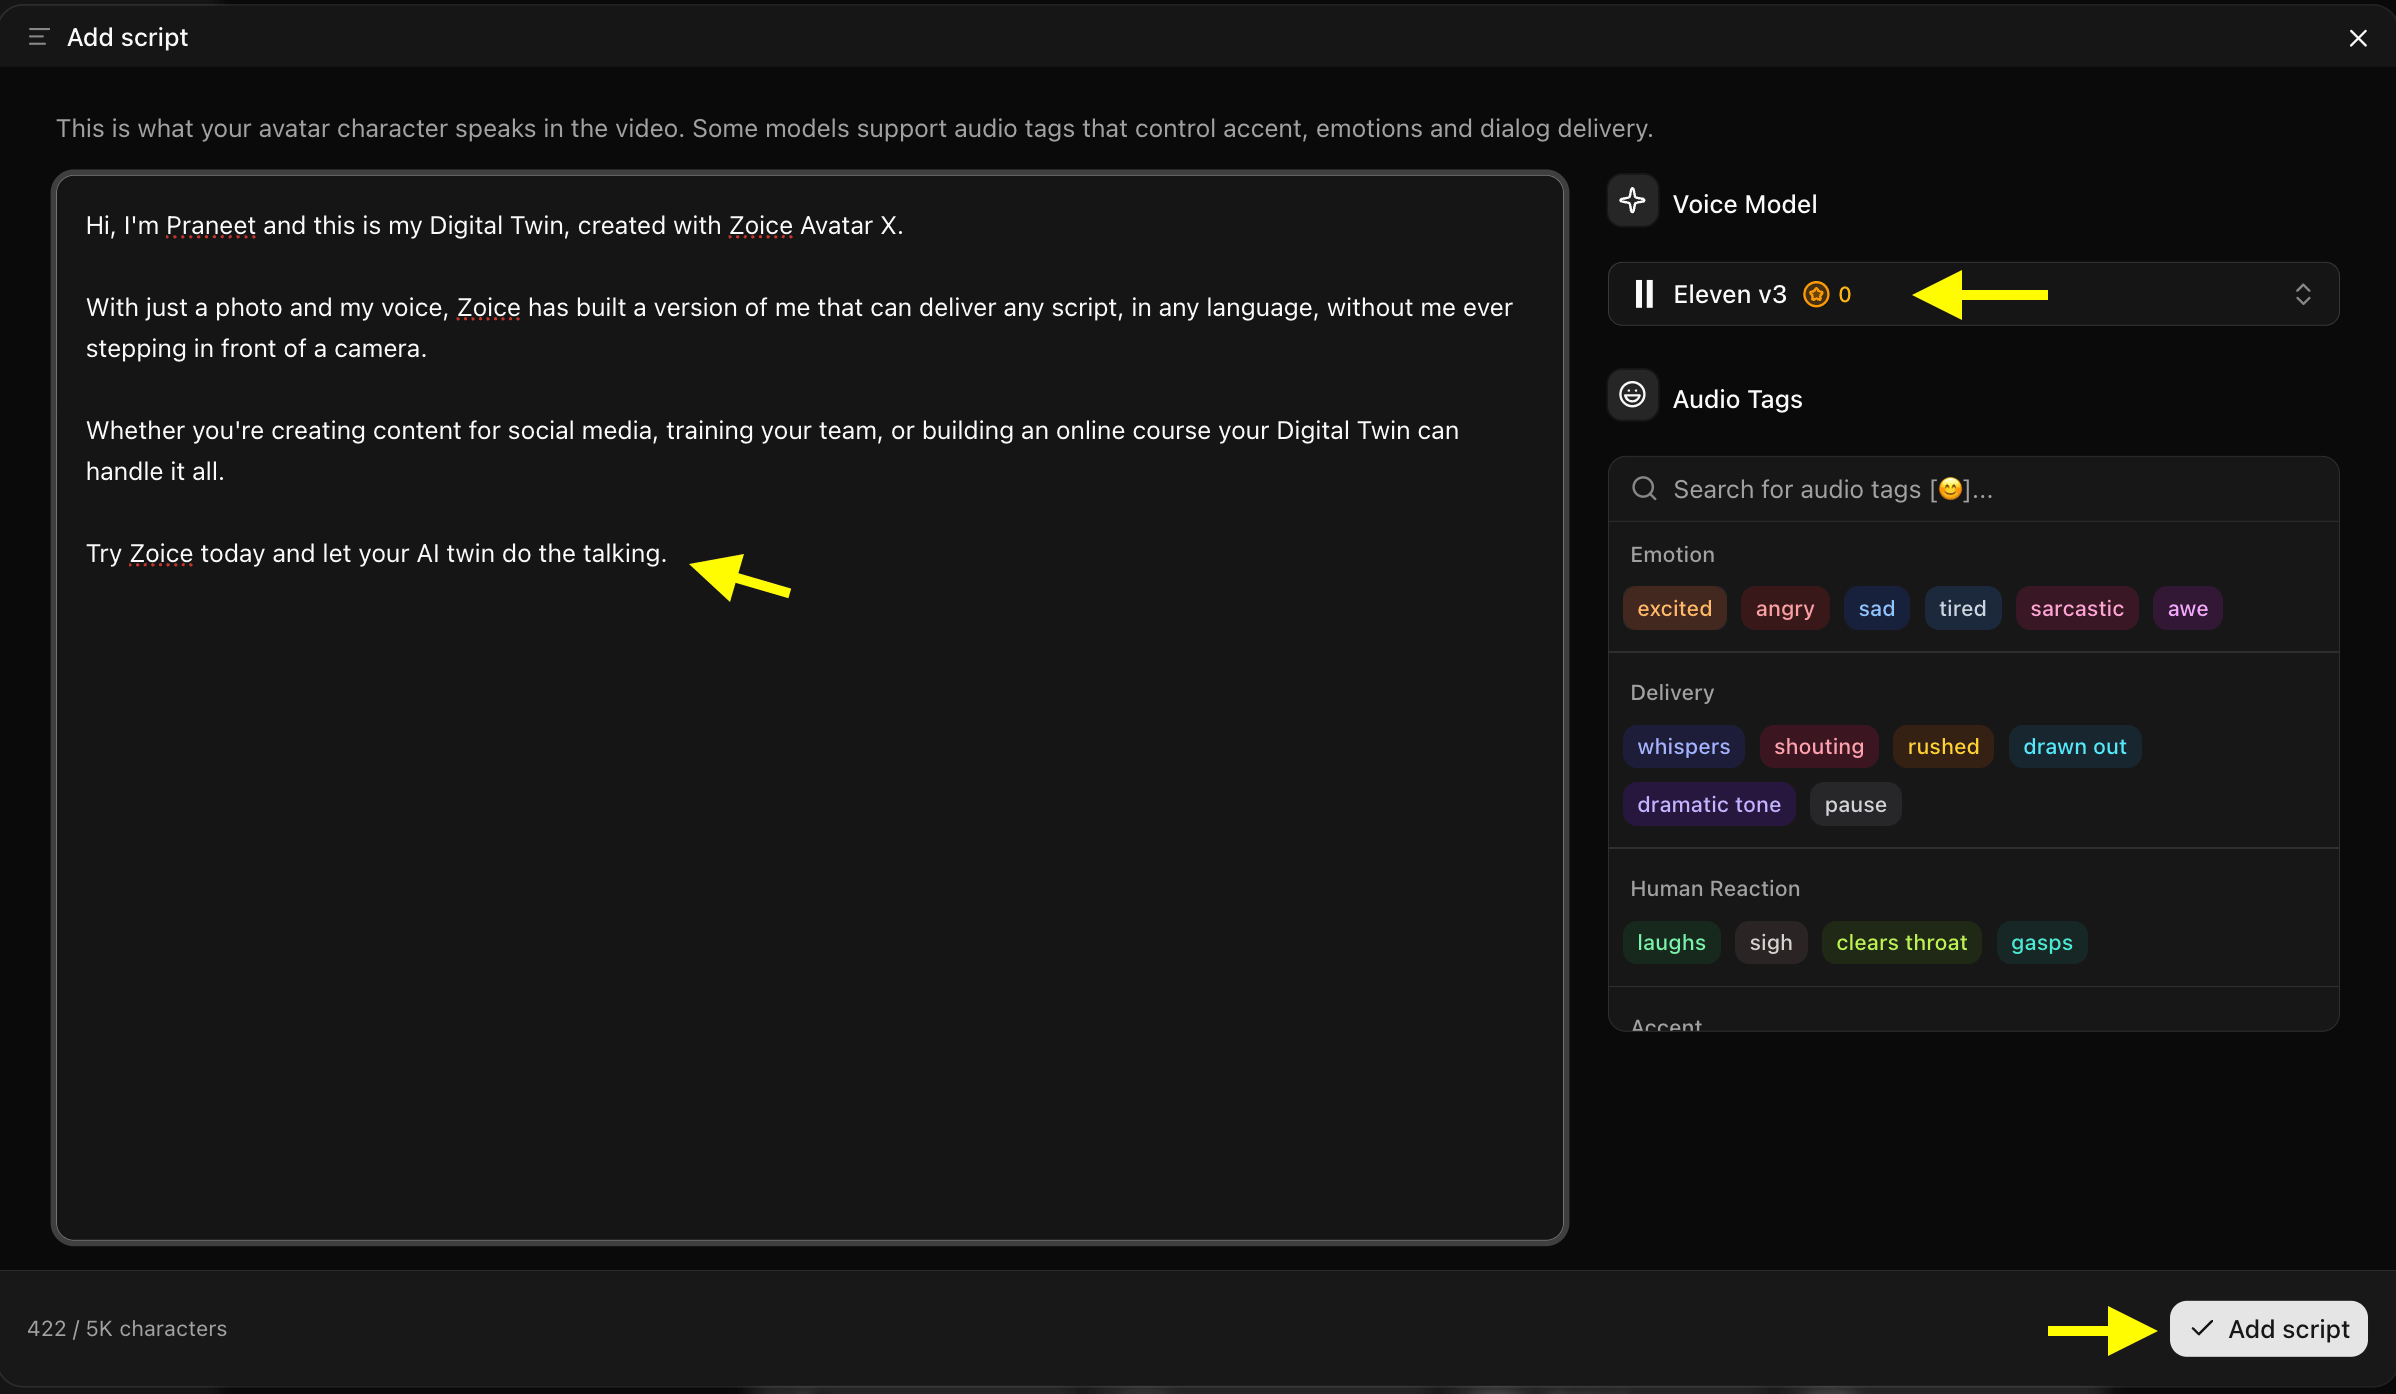 **Here is an example script you can use as a reference:**
```
Hi there! I'm here to show you what Zoice Avatar X can do from a single photo.
No camera. No recording. No studio.
Just upload your photo, type your script, and in minutes you'll have a professional talking avatar video — ready to share with the world.
Give it a try today at Zoice.com.
```
**Script tips for Avatar X Photo-to-Video:**
* Write short, clear sentences for the most natural lip-sync results
* Use commas and periods to create natural pacing — Avatar X respects punctuation
* Avoid overly long words or complex technical jargon that could affect pronunciation
* Test with a short 15-30 second script first before generating a full video
### Step 8: Select a Voice
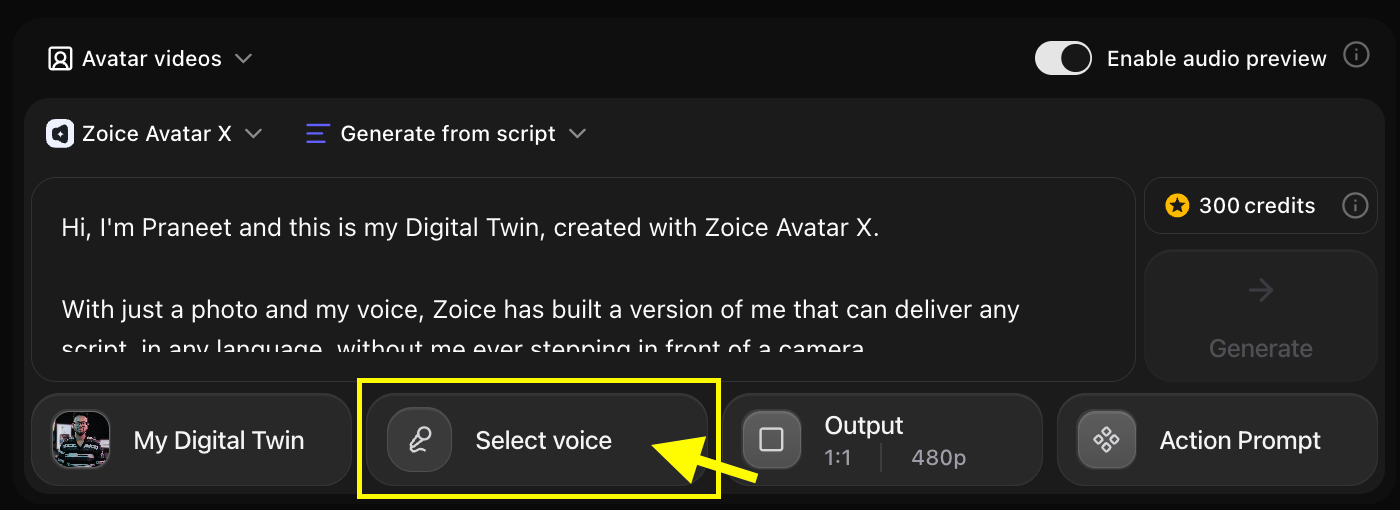
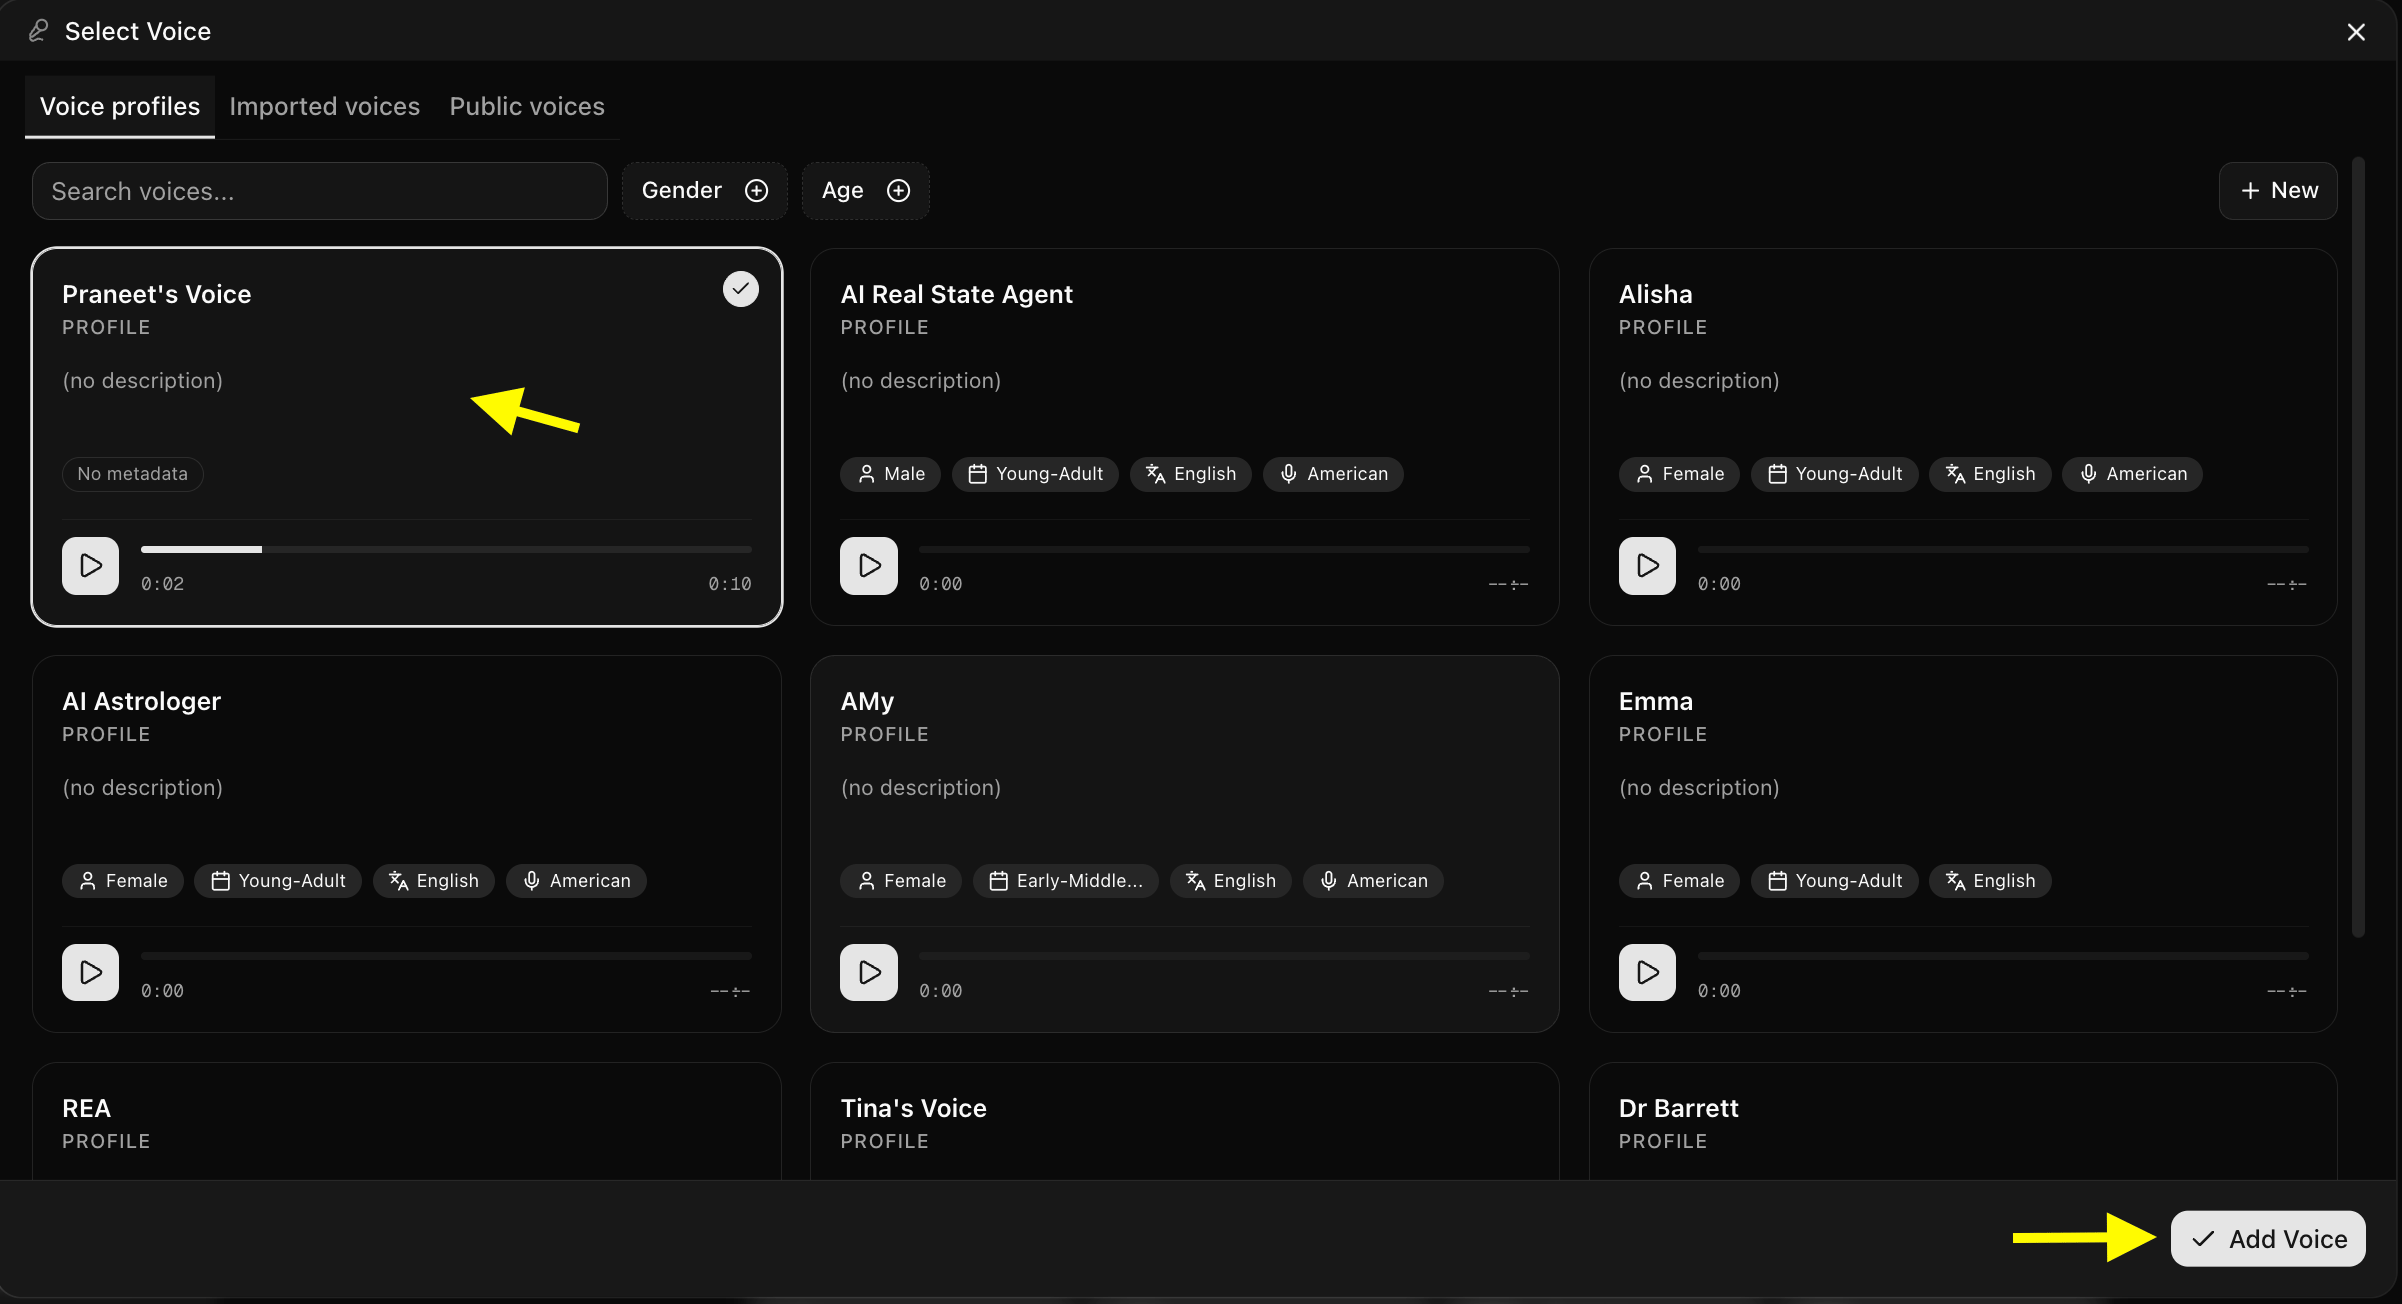
Click **Select Voice** to browse through Zoice's voice library. You can choose from 50+ public voices in a variety of languages, accents, and styles, upload your own voice recording, or import a voice profile from ElevenLabs using your API key.
**Here is an example script you can use as a reference:**
```
Hi there! I'm here to show you what Zoice Avatar X can do from a single photo.
No camera. No recording. No studio.
Just upload your photo, type your script, and in minutes you'll have a professional talking avatar video — ready to share with the world.
Give it a try today at Zoice.com.
```
**Script tips for Avatar X Photo-to-Video:**
* Write short, clear sentences for the most natural lip-sync results
* Use commas and periods to create natural pacing — Avatar X respects punctuation
* Avoid overly long words or complex technical jargon that could affect pronunciation
* Test with a short 15-30 second script first before generating a full video
### Step 8: Select a Voice
Click **Select Voice** to browse through Zoice's voice library. You can choose from 50+ public voices in a variety of languages, accents, and styles, upload your own voice recording, or import a voice profile from ElevenLabs using your API key.
 ### Step 9: Configure Output Settings
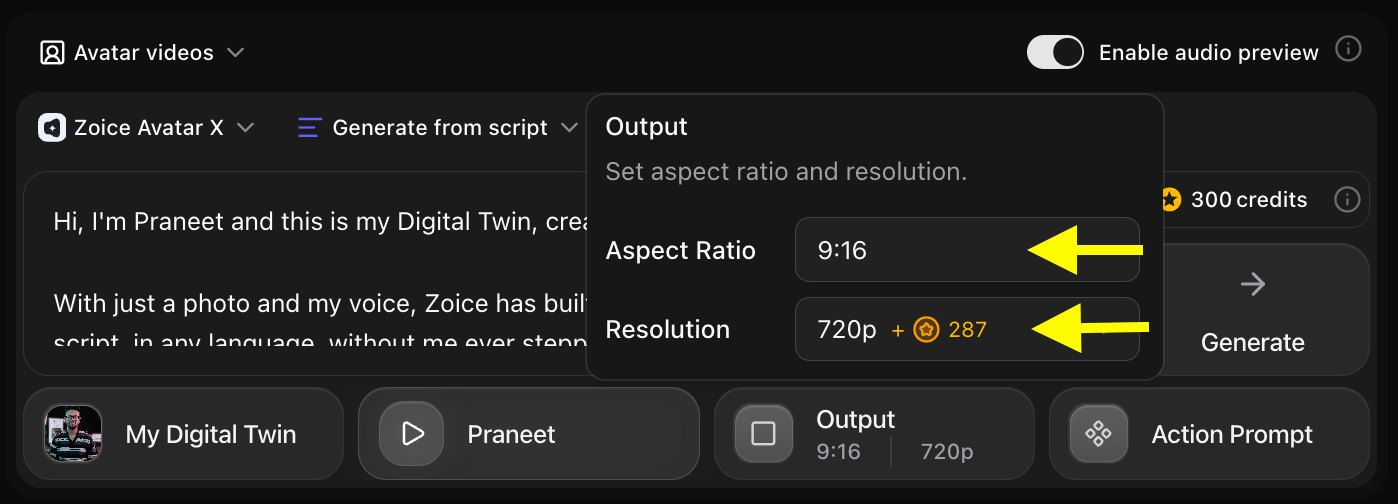
Click **Output Settings** to set the video format:
* **Aspect Ratio:** 16:9 for YouTube, websites, and presentations — or 9:16 for TikTok, Instagram Reels, and YouTube Shorts
* **Resolution:** Up to 4K for the highest-quality output
### Step 9: Configure Output Settings
Click **Output Settings** to set the video format:
* **Aspect Ratio:** 16:9 for YouTube, websites, and presentations — or 9:16 for TikTok, Instagram Reels, and YouTube Shorts
* **Resolution:** Up to 4K for the highest-quality output
 ### Step 10: Add an Action Prompt (Optional)
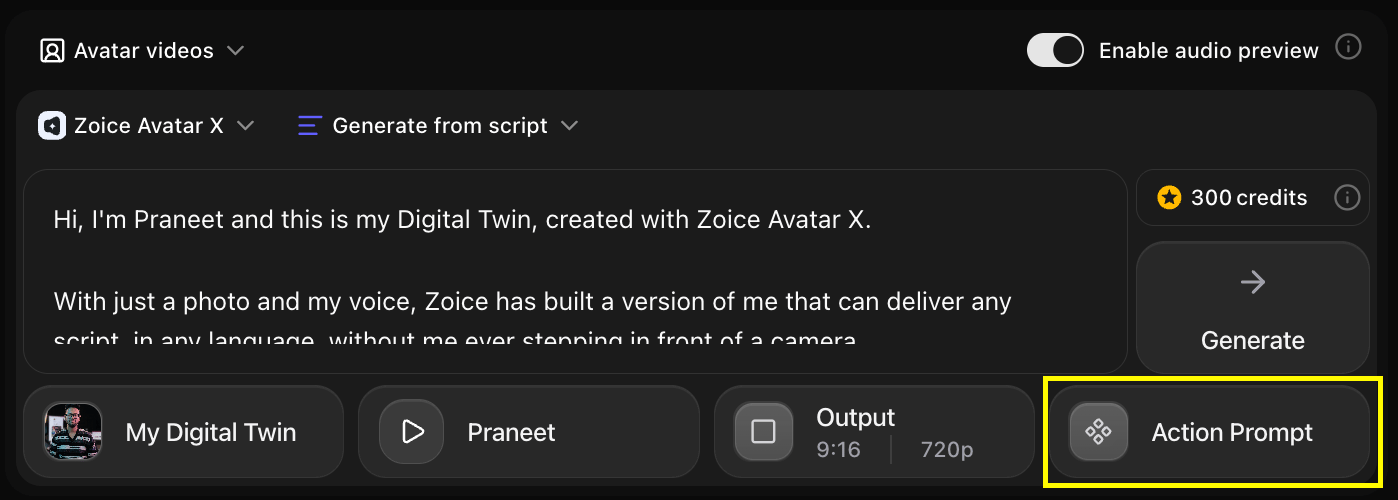
Click **Action Prompt** to define how your avatar moves and behaves during the video. You can choose from Zoice's suggested prompts or write your own.
### Step 10: Add an Action Prompt (Optional)
Click **Action Prompt** to define how your avatar moves and behaves during the video. You can choose from Zoice's suggested prompts or write your own.
 **Here is an example action prompt you can use as a reference:**
```
Friendly and confident presenter style. The avatar maintains natural eye contact with the camera. Subtle head nods at key points. A warm, genuine smile throughout. Realistic lip-syncing with gentle, natural blinking. Clean, professional delivery.
```
**Here is an example action prompt you can use as a reference:**
```
Friendly and confident presenter style. The avatar maintains natural eye contact with the camera. Subtle head nods at key points. A warm, genuine smile throughout. Realistic lip-syncing with gentle, natural blinking. Clean, professional delivery.
```
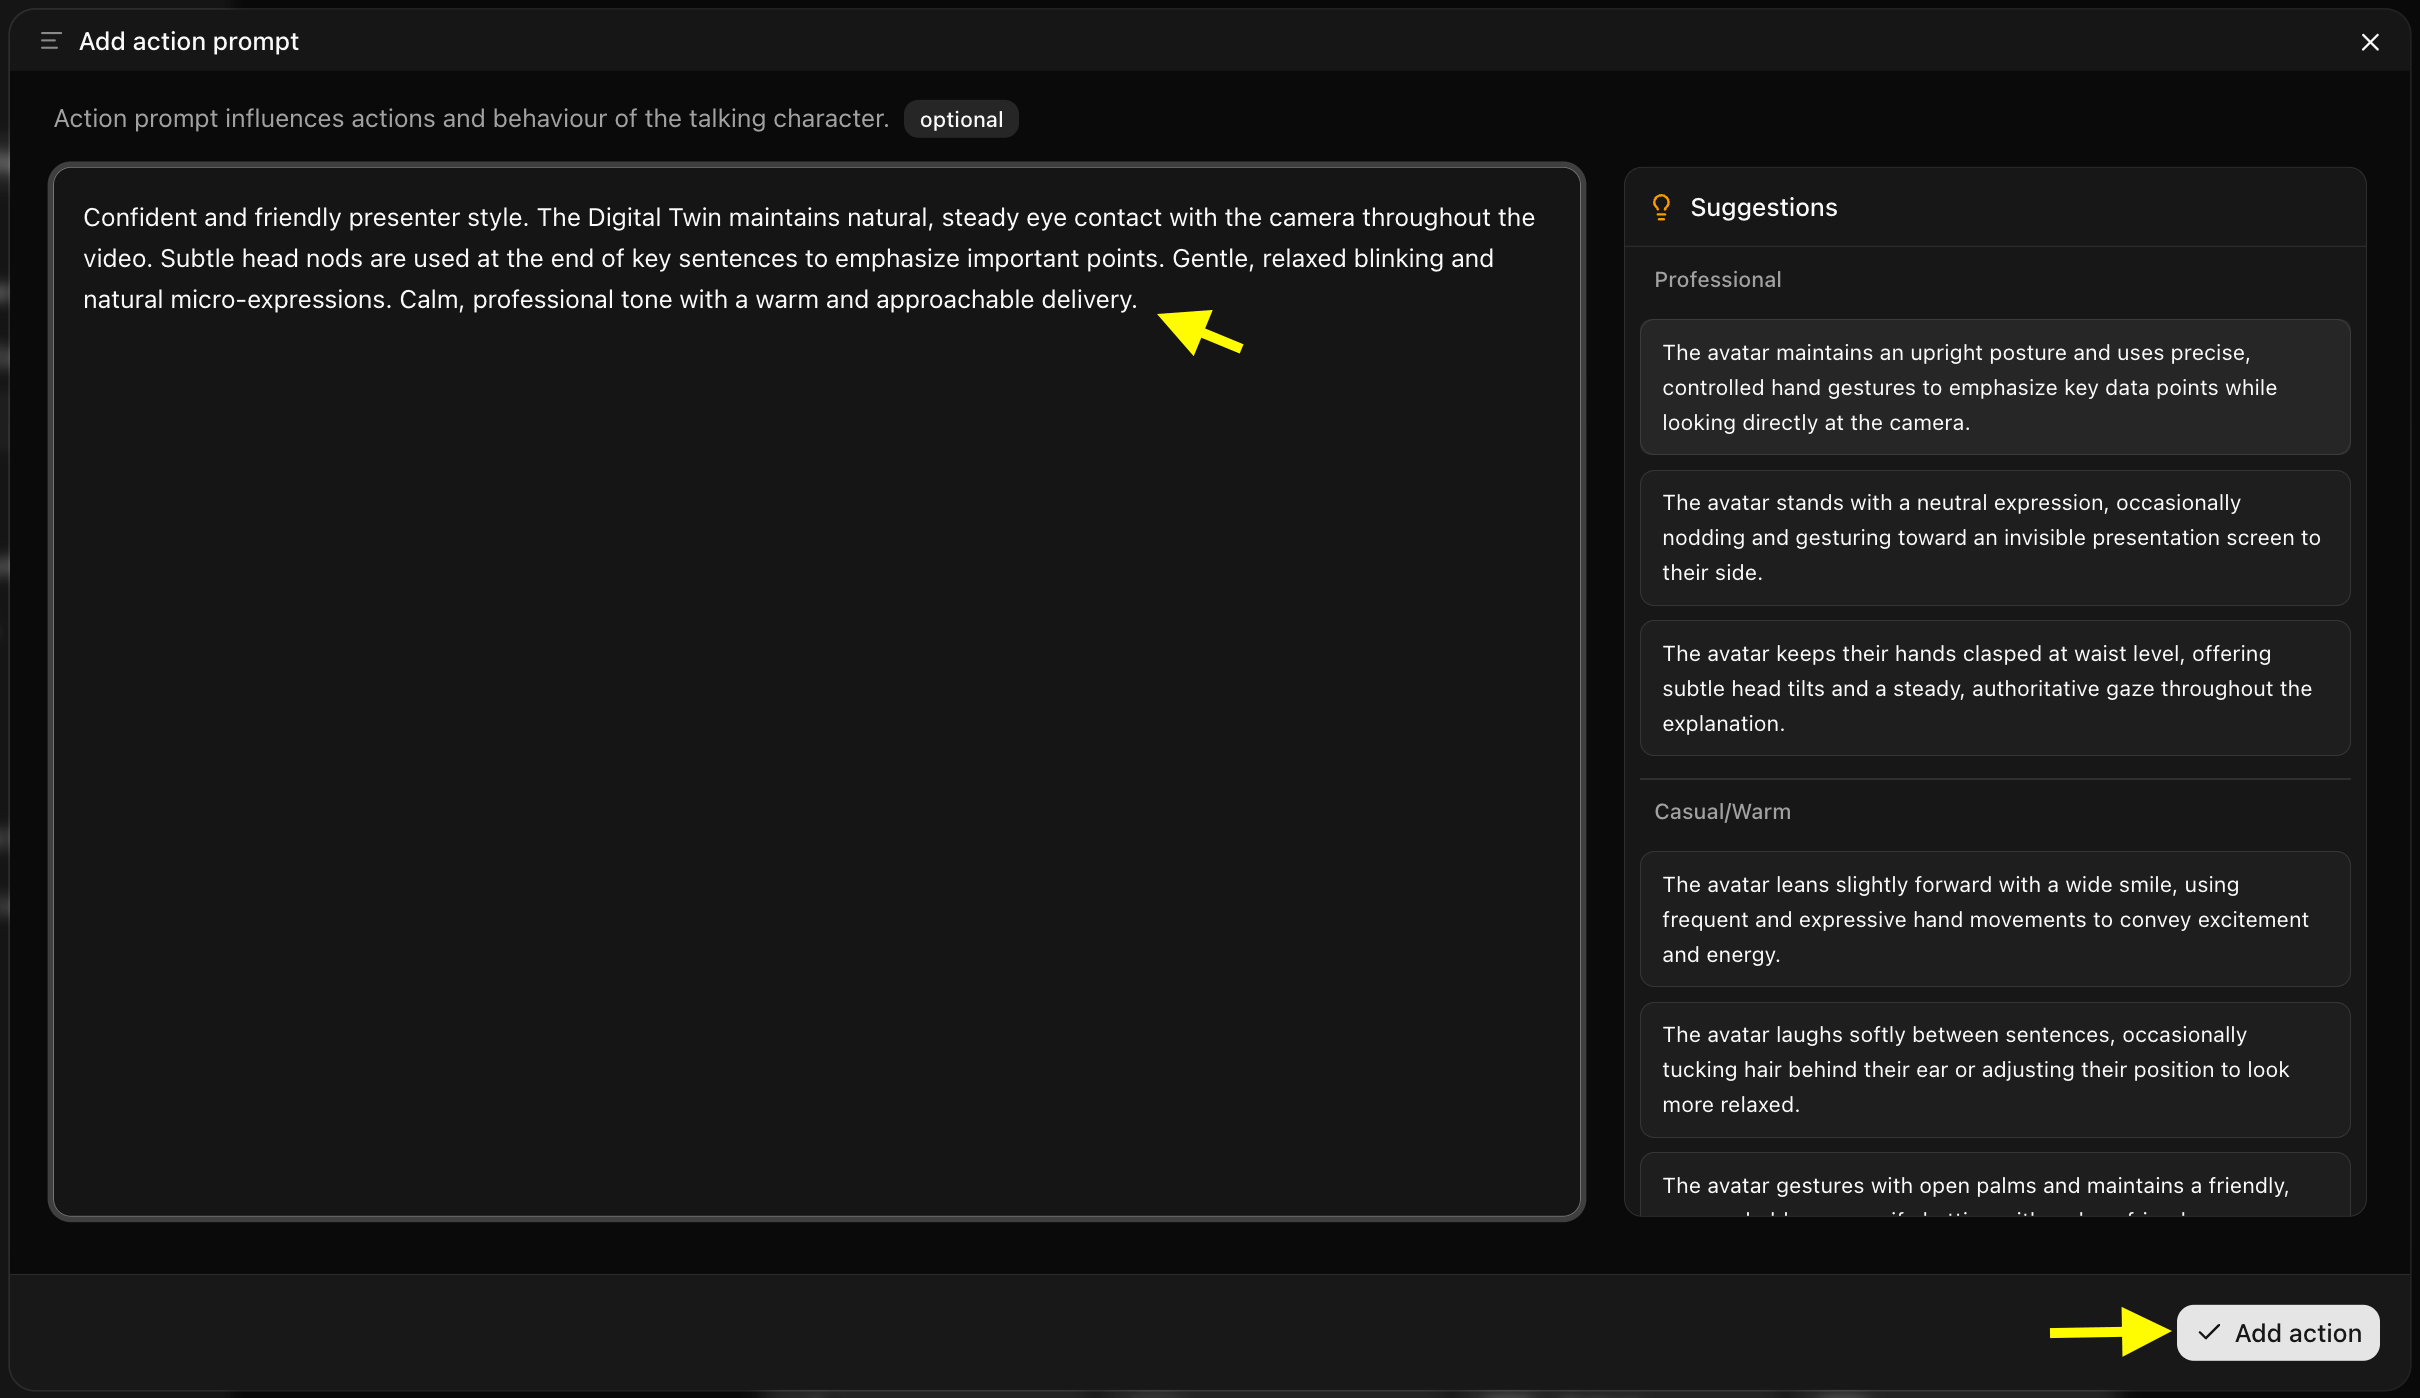 Use specific, visual language in your action prompt rather than vague terms. Instead of "look natural," write "maintain soft eye contact with the camera and use gentle head nods at the end of each key sentence." Specific instructions produce more consistent and professional results.
### Step 11: Generate the Video
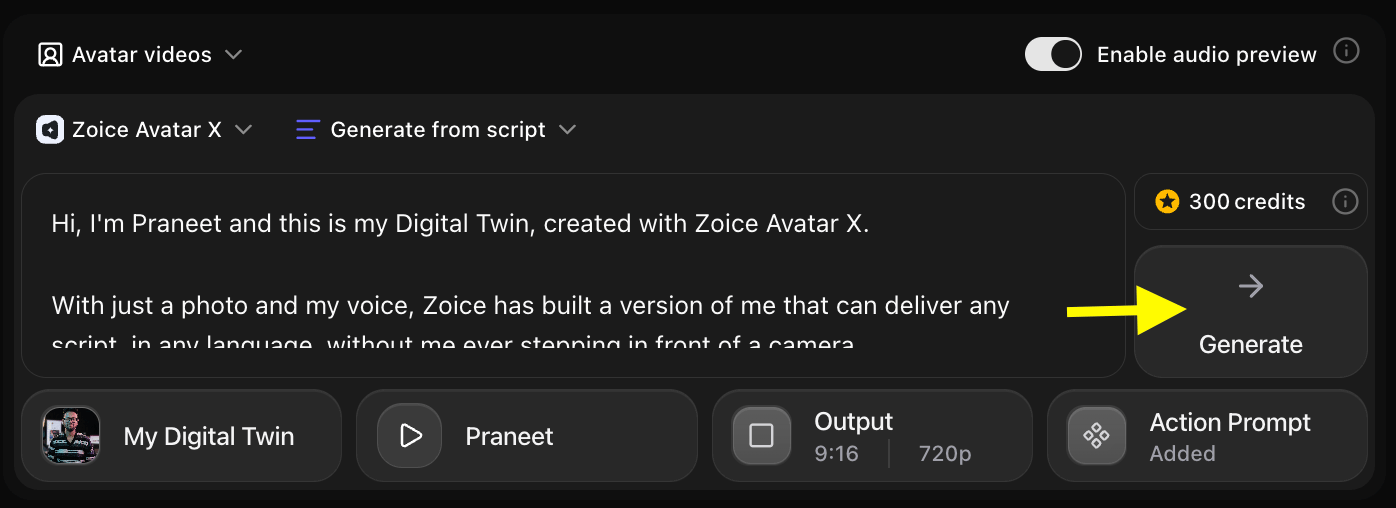
Once your script, voice, output settings, and action prompt are all configured, click the **Generate** button to start the Avatar X rendering process.
Use specific, visual language in your action prompt rather than vague terms. Instead of "look natural," write "maintain soft eye contact with the camera and use gentle head nods at the end of each key sentence." Specific instructions produce more consistent and professional results.
### Step 11: Generate the Video
Once your script, voice, output settings, and action prompt are all configured, click the **Generate** button to start the Avatar X rendering process.
 ### Step 12: Preview Audio and Click Generate Avatar Video
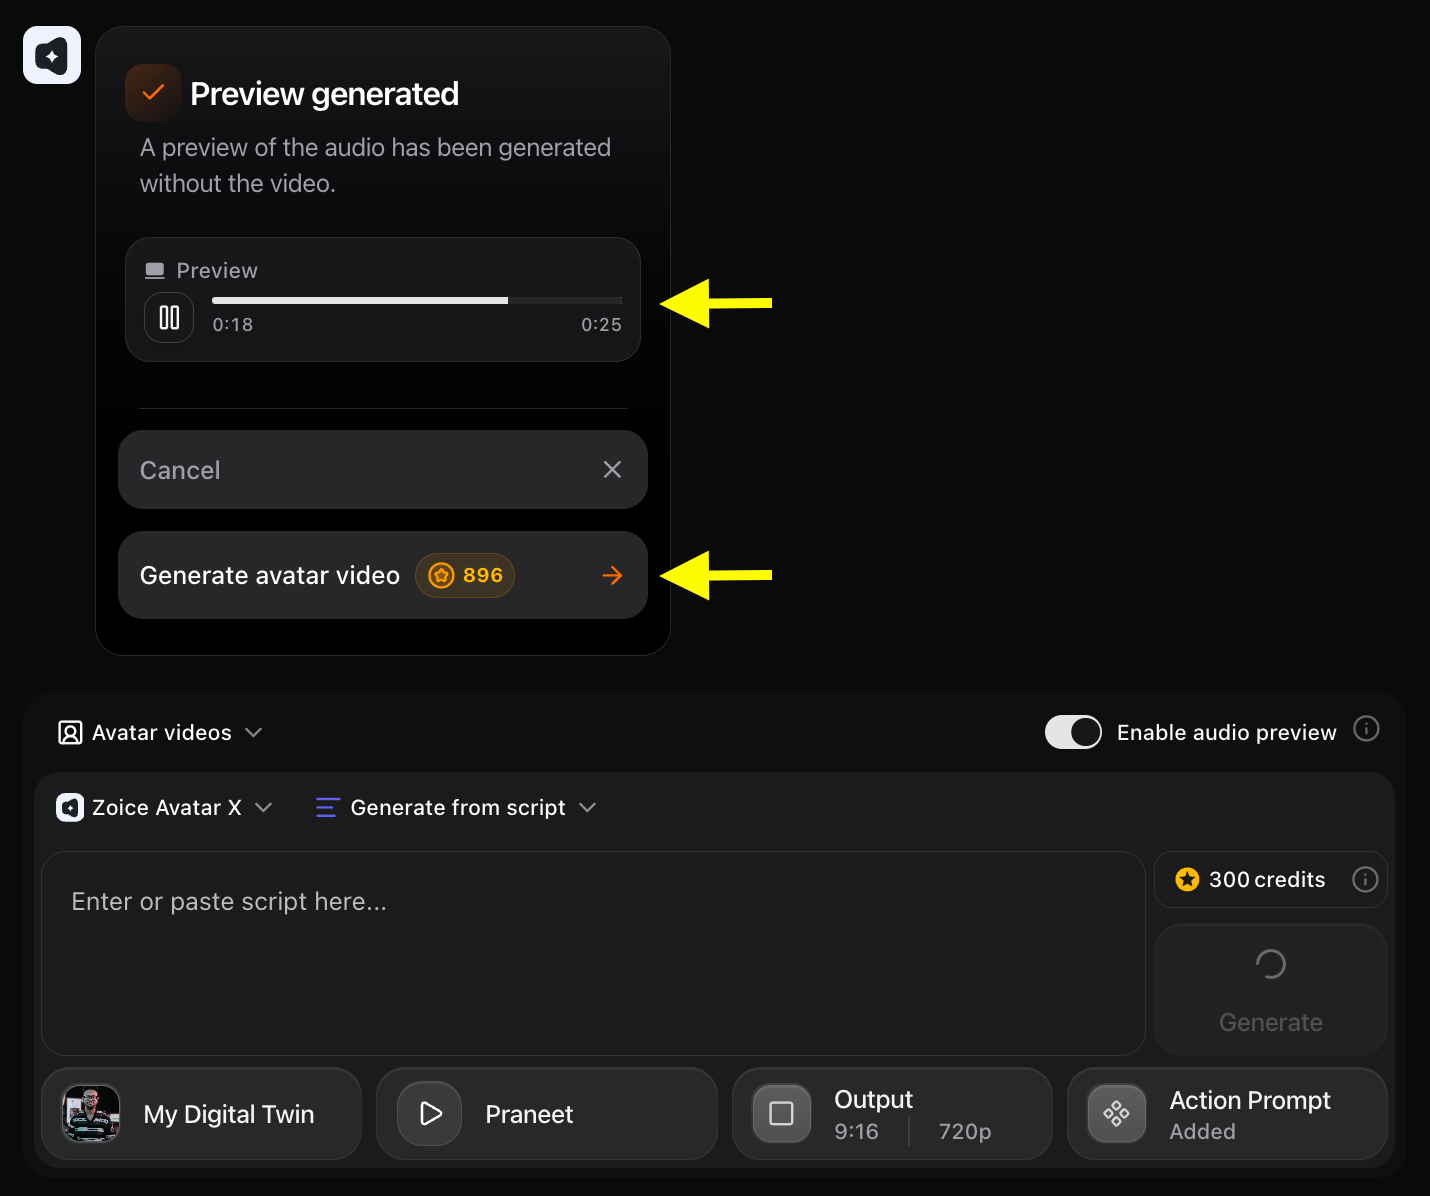
Before the final video is rendered, Zoice generates an audio preview so you can review the voice delivery, pronunciation, and pacing. Listen carefully and confirm everything sounds correct, then click **Generate Avatar Video** to render the final output.
### Step 12: Preview Audio and Click Generate Avatar Video
Before the final video is rendered, Zoice generates an audio preview so you can review the voice delivery, pronunciation, and pacing. Listen carefully and confirm everything sounds correct, then click **Generate Avatar Video** to render the final output.
 ### Step 13: Preview and Download Your Avatar Video
Once processing is complete, play the final video to review the avatar's lip-sync accuracy, head movements, expression quality, and overall video appearance.
### Step 13: Preview and Download Your Avatar Video
Once processing is complete, play the final video to review the avatar's lip-sync accuracy, head movements, expression quality, and overall video appearance.
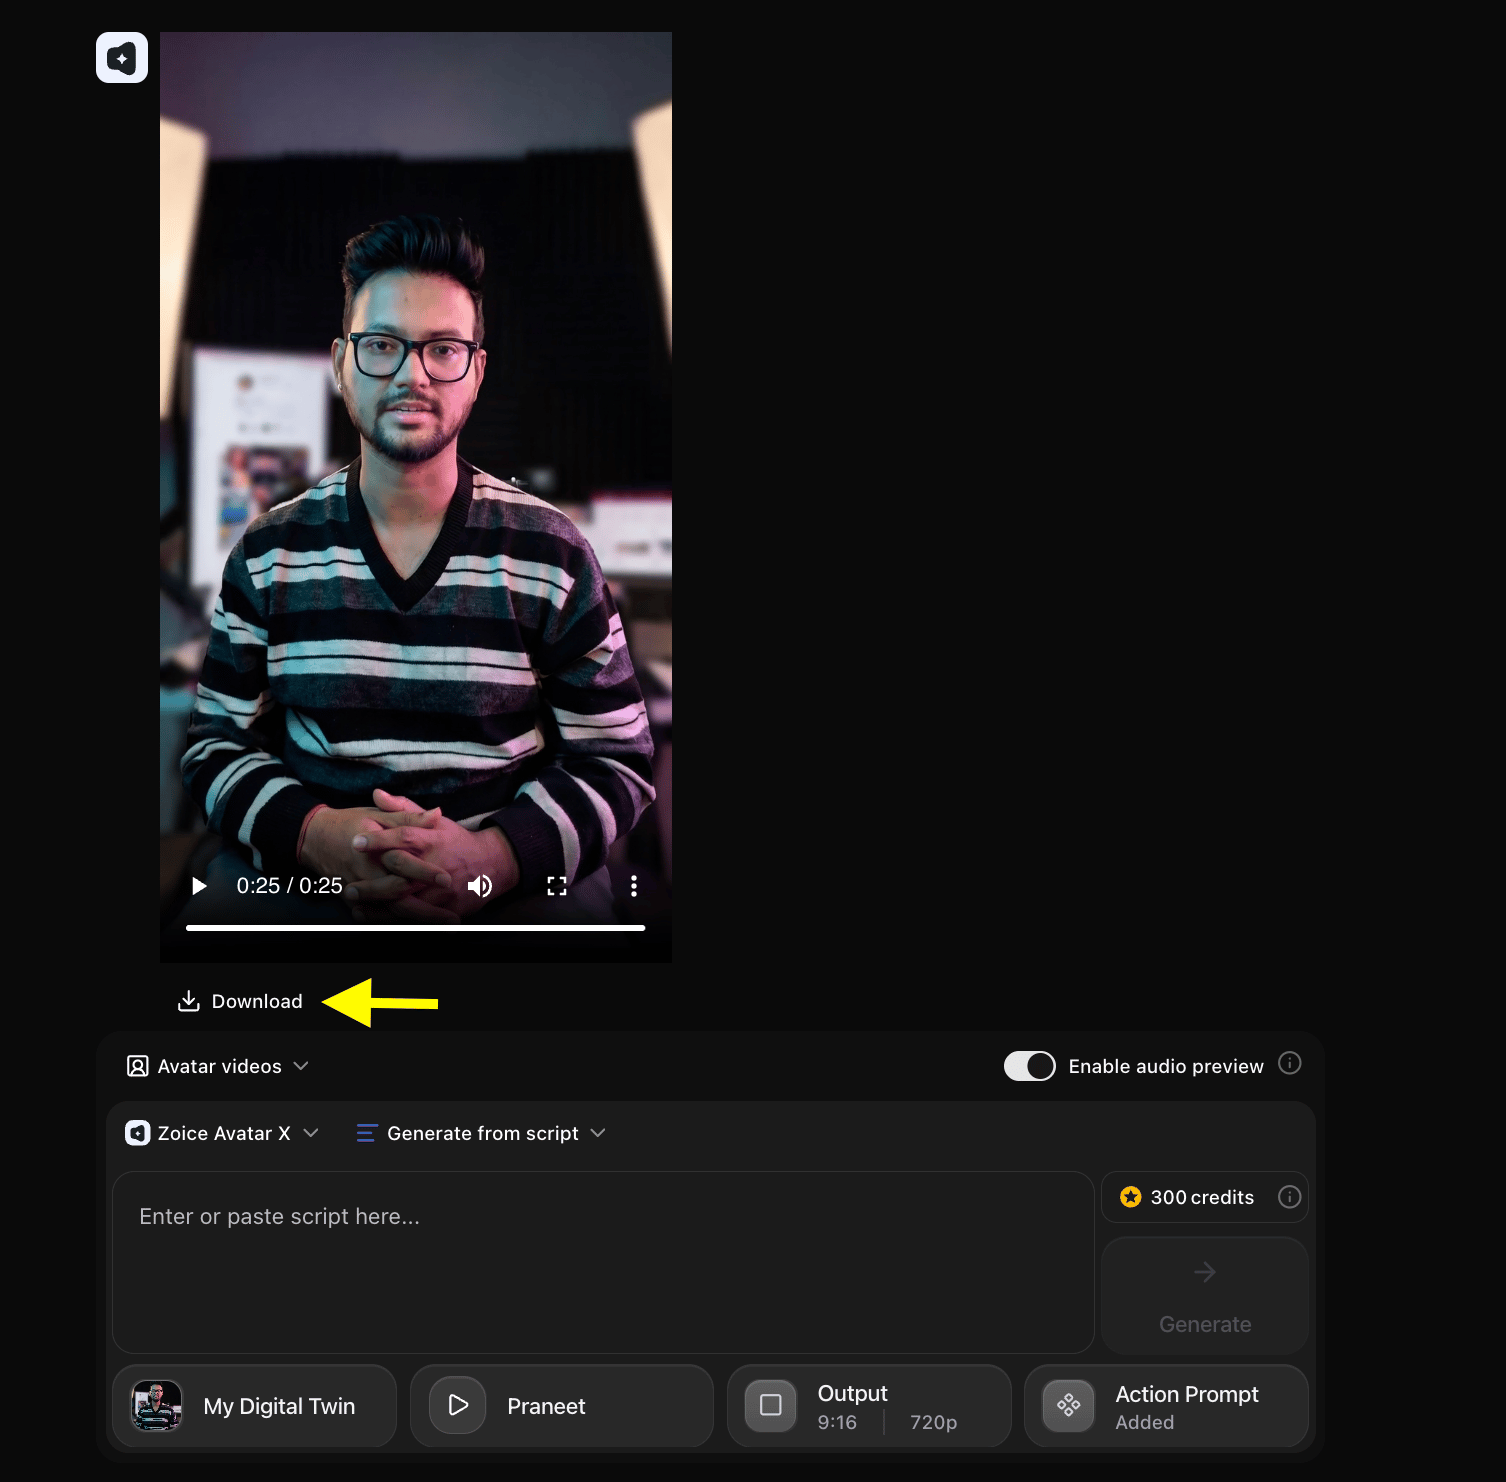 If you are happy with the result, click **Download** to save the video to your device. Your Avatar X Photo-to-Video is now ready to publish, share, or embed wherever you need it.
## Output Result Video
Below is the rendered avatar video using Avatar X Photo-to-Video:
## Tips for Better Photo-to-Video Results
### Choosing the Right Photo
The quality of your photo directly affects the quality of your avatar video. Here is what works best:
* **Front-facing photos** produce the most natural lip-sync and expression animation
* **Simple, neutral backgrounds** keep the focus on the face and improve rendering accuracy
* **Good lighting** — evenly lit faces with no harsh shadows or overexposed spots
* **High resolution** — sharp, crisp photos render significantly better than blurry or compressed images
* **Natural expression** — a relaxed or gently smiling face gives Avatar X the most flexibility to animate a wide range of emotions
### What to Avoid
* Avoid photos with strong side angles or tilted heads
* Avoid photos where part of the face is obscured by hair, hands, or accessories
* Avoid very small or low-resolution images (less than 300x300 pixels)
* Avoid images with dramatic filters, heavy editing, or artistic stylization
## What Can You Create With Photo-to-Video?
Avatar X Photo-to-Video is a versatile tool that can be used across a wide range of content types:
* **Brand spokesperson videos:** Create a consistent on-screen presenter for your brand using a single professional photo
* **YouTube and social media content:** Generate regular video updates without filming
* **Product explainer videos:** Animate a presenter to walk viewers through your product features
* **Course and training content:** Build entire online course modules from text scripts
* **Multilingual campaigns:** Use the same avatar and script in multiple languages by switching the voice
* **News and announcement videos:** Deliver weekly updates or press releases with a polished avatar presenter
**Still need help?**
If you have any questions, reach out to the Zoice support team at [contact@zoice.com](mailto:contact@zoice.com).
## Next Steps
Go deeper with a full Digital Twin setup — photo, voice clone, and unlimited video generation.
Learn the full Photo Avatar workflow including AI prompt generation.
Use your Photo-to-Video avatar as a professional broadcast news presenter.
Present property listings and market updates with a professional AI agent.
If you are happy with the result, click **Download** to save the video to your device. Your Avatar X Photo-to-Video is now ready to publish, share, or embed wherever you need it.
## Output Result Video
Below is the rendered avatar video using Avatar X Photo-to-Video:
## Tips for Better Photo-to-Video Results
### Choosing the Right Photo
The quality of your photo directly affects the quality of your avatar video. Here is what works best:
* **Front-facing photos** produce the most natural lip-sync and expression animation
* **Simple, neutral backgrounds** keep the focus on the face and improve rendering accuracy
* **Good lighting** — evenly lit faces with no harsh shadows or overexposed spots
* **High resolution** — sharp, crisp photos render significantly better than blurry or compressed images
* **Natural expression** — a relaxed or gently smiling face gives Avatar X the most flexibility to animate a wide range of emotions
### What to Avoid
* Avoid photos with strong side angles or tilted heads
* Avoid photos where part of the face is obscured by hair, hands, or accessories
* Avoid very small or low-resolution images (less than 300x300 pixels)
* Avoid images with dramatic filters, heavy editing, or artistic stylization
## What Can You Create With Photo-to-Video?
Avatar X Photo-to-Video is a versatile tool that can be used across a wide range of content types:
* **Brand spokesperson videos:** Create a consistent on-screen presenter for your brand using a single professional photo
* **YouTube and social media content:** Generate regular video updates without filming
* **Product explainer videos:** Animate a presenter to walk viewers through your product features
* **Course and training content:** Build entire online course modules from text scripts
* **Multilingual campaigns:** Use the same avatar and script in multiple languages by switching the voice
* **News and announcement videos:** Deliver weekly updates or press releases with a polished avatar presenter
**Still need help?**
If you have any questions, reach out to the Zoice support team at [contact@zoice.com](mailto:contact@zoice.com).
## Next Steps
Go deeper with a full Digital Twin setup — photo, voice clone, and unlimited video generation.
Learn the full Photo Avatar workflow including AI prompt generation.
Use your Photo-to-Video avatar as a professional broadcast news presenter.
Present property listings and market updates with a professional AI agent.